

Sewerage in the house do it yourself Construction
Sewerage is one of the benefits of civilization and the indispensable attribute of the modern house, with which the water used is allotted from the room. In our article, we consider an example of self-seating in a private house, taking a standard set for a sample - washbasin, kitchen sink and washing machine.
Content
Choose pipes
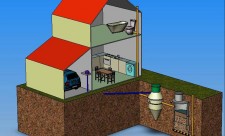
Before proceeding with work, it is necessary to figure out, which is the sewage system of a country house, from which items. Conditionally, the entire system can be divided into three parts - the inner, which is located directly in the house, outdoor, which is located on the street and the third part, the place where the water used will be assembled - the tank for collecting or a cesspool.
Despite the fairly wide selection of different sewer pipes, the optimal option is plastic pipes. And there are several reasons for it - affordable price, easy installation and replacement if necessary, durability. It is from such pipes and will consist our sewage.
For greater convenience and simplicity, we will use pipes of different lengths and diameter, as well as, depending on the purpose, and different wall thicknesses. As for the length, we will use pipes long from 15 cm to 4 m and diameter - 50 - 100 mm. Buying pipes, you should pay special attention to the presence of rubber sealing rings, which must be installed in the terminals of pipes. Without them, all the work will go to the pump.
Let's look at what we need to build your sewer system. The most important and most mass element is the sewage pipe (Fig. 1), which actually form the system. For outdoor use, it is necessary to choose pipes with a wall thickness of 3 mm, for internal use sufficient thickness of 2 mm. It is also worth paying attention to the quality of the surface, it is desirable that there are no defects and bulges on it, because with time they can turn into holes.

Tires of sewage pipes (Fig. 2) are used to change the direction of the highway. On one side of the outlet, there is a socket with a sealing ring for a connection, on the other hand - a conventional pipe with a chamfer removed for a more convenient connection. The angle of removal may be different, the choice depends on the specific situation.

A tee for sewage pipes (Fig. 3) is used to add drain points or branching system. Triple variants a large amount, the choice of a specific type depends on the working conditions and necessity.

Revision of pipes (Fig. 4) is used to perform prophylactic work in sewage. It is installed on each bend system, with the exception of situations when there is direct access to turning.
The terminal plug (Fig. 4,) is used to close unnecessary branches of pipes.
Fastening the pipe (Fig. 4) is used to secure the pipe.
Adapter (Reducer) (Fig. 4) is used when connecting pipes of various diameters.

Outdoor work
Having understood with the main elements, you can go directly to the sewage creation process. The sewage device in the house consists of several stages. The initial stage is outdoor work, the stage is quite complex and time-consuming. Here you will have to jump trenches under the sewer pipes, as well as a cesspool. To avoid unnecessary work, and subsequently not to redo the made, it is necessary to consider everything in advance, determined with the location of the drain pit, the location of the pipes, as well as the place of their input to the house.
After choosing a pipe output from the house, start digging the trench, observing the slope of at least 1 cm per meter of the trench. The depth of the trench itself depends on the climatic conditions of your area and on average ranges from 70 to 120 cm. Also, the temperature of the outgoing water also affects the depth of the trench.
If the fluid is heated at least up to 15 degrees (and the presence of a washing machine in the house suggests that the temperature will be higher), then the depth of about 50 cm is allowed. If there is no possibility to pave pipes at sufficient depth, they can be insulated. To do this, you can use a foam nozzle on the pipes, passing them from above the layer of foam, thickness 2 - 4 cm. This will be more than enough to prevent the freezing of pipes even during severe frosts. And do not forget that the periodic descent of warm or hot water will also help to avoid problems with freezing, and as a result, with the stress of water in the pipes.
As for the depth of the pipe inlet into a cesspool or septic, it should be about 100 cm. The width of the trench does not have a fundamental importance, the most important thing is that it is convenient to work (Fig. 5).

After calculating the depth of the trench, remember that it is necessary to put a sandy pillow with a thickness of 10-15 cm with a thickness of a pipe from damage.
At the end of earthworks, it is necessary using a special tool to do a hole for entering the pipe into the house. Such a hole is done at the foundation level and the diameter should be slightly larger than the diameter of the pipe. But it is not necessary to extraditiate, too much the hole is absolutely no need.
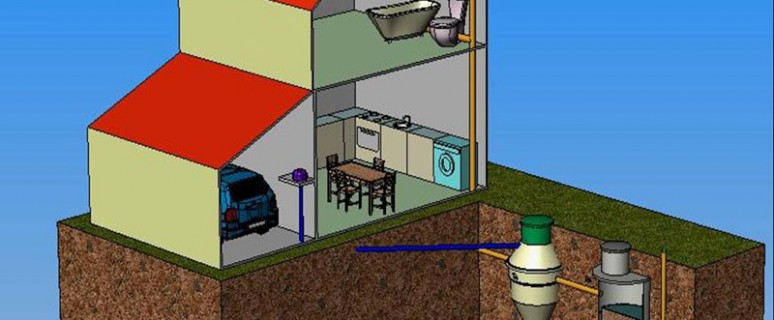
Sewage collector device
After performing earthenware in terms of digging trenches, we go to the next, even more complex and volumetric stage - chloride and the arrangement of the collector. At the moment there are several different types of collectors, each of which has its own advantages, but we will focus on the Septician version. This option is the optimal solution in a situation where the simple and inexpensive is required, but the effective system, which also does not need to be maintained. Cleaning such a structure is carried out very rarely - once a few years.
The essence of the septicity is very simple. The wastewater falls into the sump, decompose in it and enter the well to filter in the form of water in which the minimum number of organic and harmful toxins are located. What is needed for a private house.
The septic device is performed according to such a scheme:
For the beginning, the pit is rotated, the volume of which depends on the planned daily rate of wastewater, which in turn depends on the number of family members. For example, for a family of three people, an approximate daily volume of water consumption is about 8 meters of cubic.
Kotlovan himself is divided into two sections - sump and filtration well. If the septic device will be used for the device, concrete rings will be used, then it is necessary to lower them into the well, having formed both sections from them. If there is no rings, the elements of the septica are made using formwork and the subsequent fill with concrete design.
The bottom of the sump is concreted, and at the bottom of the second section, the septic is laid drainage, as a gravel or pebble can act. Two sections are connected to the overflow tube, everything is closed with a reliable cap, in which there must be a small hole for ventilation. All, septic tank ready.

Laying pipes
After that, you can move directly to laying pipes. There are several laying technologies - from the lower point of the highway, from the top point, etc., but in this situation, given that the work is not conducted by professionals, it is more expedient to perform laying in parts, first the external part of the system, then internal, followed by a highway .
So, proceed to laying the outer part of the system. The autonomous sewerage of the private house is quite easy to install, largely due to the convenient design of the pipes. The first pipe is stacked in such a way that it is centimeters to 30 in a cesspool, and the fool of the pipe was directed from the pit.
Installation of the highway is performed as follows - the pipe is inserted into the socket of the next pipe, first until it stops, and then pulls into several millimeters, which allows you to create a thermal gap. Before laying pipes should be checked for rubber sealing rings in the pipes. When installing the system, it is necessary to ensure that these rings do not come out from their seats. It is also worth monitoring that the pipes do not have sent to each other, this will lead to a disruption of sealing at the joints.
Pipes have a standard size, but if necessary, you can cut off the pipe of any size using a hacksaw or a grinder. But, and this is very important, cutting a piece of pipe of the desired size, do not forget the file or emery to make a chamfer on the edge, from the other side where the pipe will enter the slur. If this is not done, the sharp edge of the pipe can damage the sealing ring, which will lead to a disruption of sealing, and as a result, the flow of the system.
As you can see, everything is simple enough, and the installation itself does not take much time. The main thing is not to rush and be attentive throughout the workflow.

Internal work and installation of the system
Conducting the sewer in the house, after performing outdoor work, you can move to the works internal. Installation of sewage in the house begins with planning. First, it is necessary to create a sequence diagram in the house and localize future drain points. The wiring of the sewage in the house depends on the location of its objects, so, deciding with the arrangement, we can move on.
Locking the pipe indoors, it is necessary, as in external work, make a small slope - about 20 mm per meter pipe. Since at this stage we are without installing the toilet, we are quite enough to use pipes with a diameter of 50 mm. When installing and connecting toilet bowl, the diameter of pipes should be 100 mm.
The process of mounting pipes indoors is no different from the work outside, which was described slightly higher.
When carrying out internal work, it is necessary to establish a hydroplays in the system, which is a small portion of the pipe bent with a knee in which water is located. Its presence will prevent the appearance of an unpleasant smell from the sewage.
To secure the pipe, you can use special fasteners. But you should not install them before, it is much better to use them as needed.
After installing pipes in the room, the output is output and the connection with the outside of the system. The opening in the foundation can be sealed using mounting foam and plaster.

Final stage of work
Setting the pipes, you can move to the trenches. But for a start, it is necessary on the sides of the pipes and from above, put a small pillow from the sand, slightly tampering it. Such a pillow will prevent damage to pipes. And after its laying, you can safely fall asleep the trenches of the earth, periodically her tampering.
Do not hurry to remove the land that will remain after falling asleep. The land in trenches will meet with time, here it is useful to the remaining part of the Earth.
On this, the process of creating a sewage can be considered finished. This option is the simplest, without a pumping pump and other technical delights, but at the same time it is quite effective, perfectly coping with its duties - the removal of used water from the house. In addition, due to its simplicity, the installation of such sewage does not cause special problems, and its cost is available for everyone.
Calculators


Correct tool sharpening. How to sharpen the tool with your own hands 29.01.2017
In the process of operation, the cutting edges of the instruments are stupid, which leads to a decrease in the quality of processing parts and blanks, to a decrease in labor productivity, as well as to the wear of the tools themselves. Right ...


Themed photos