

Correct tool sharpening. How to sharpen the tool with your own hands Instruments
In the process of operation, the cutting edges of the instruments are stupid, which leads to a decrease in the quality of processing parts and blanks, to a decrease in labor productivity, as well as to the wear of the tools themselves. Proper sharpening solves all the above problems. A beginner master should examine the recommendations for the proper sharpening of the tool in various ways.
Content
General instruments sharpening principles
In order to bring the cutting edge of any tool into suitability for further work, you must follow the following.
Formation of primary chamfer
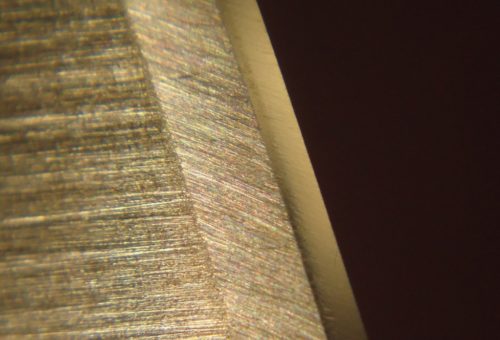
Corners of the primary chamfer and cutting edge
The process is the processing of the blade using a sharpening machine or a flat stone in such a way as to form a primary chamfer (SCOS at an angle of 25 or 30 degrees). It is important to comply with certain rules.
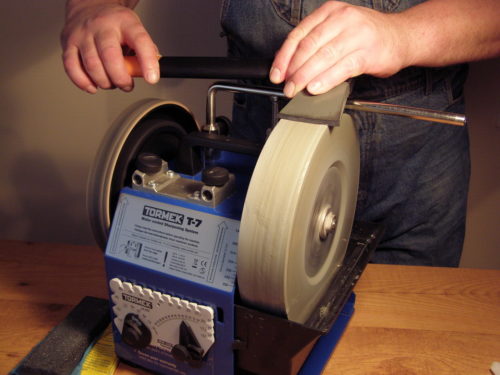
- The electric tool for sharpening will be more efficient if it is necessary to eliminate deep jar and chips.
- The frequency of rotation of the abrasive circle should not exceed 2000 rpm, the grit of the circle is selected in the range of 100-120 units.
- It is recommended to sharpen abrasive on the basis of aluminum oxide, as they (in contrast to conventional silicon) are capable of providing proper quality of metal processing. In addition, such circles do not overheat metal.
- With manual sharpening use sandpaper or abrasive stone with graininess within 100-320 units.
- In order to prevent overheating and oxidation of the surface of the edge (which leads to mitigating the metal), during the sharpening process, it is necessary to periodically cool the blade, lowering it into cold water.
Important: The primary chamfer form depends on the method of sharpening. It is manually formed a flat chamfer, and with the help of electrical out - concave.
Formation of cutting edge
After the primary chamfer will be ready, it is necessary to bring the blade to the required sharpness. In the process of finishing the following is performed.
- The tool is fed to the plane of the abrasive circle at an angle, increased by 4-5 ° from the previous position. The edge of the blade must be processed so as to get a narrow microfack.
- For sharpening, sandpaper 600-8000 units are used. graininess. It is important to stop the process in time to prevent the impairment of the cutting tool.
- The effective grinding of the edge is performed in two stages: first by abrasive graininess 1000-4000 units, and then - 5000-8000 units.
- We make the correct form of the cutting edge using the "cart" - a sharpening device in which the tool is installed and fixed under the necessary angle. This sharpening method is suitable for narrow (minimum 6 mm) and wide (up to 73 mm) blades, which are used in the plane. The roller allows you to freely move the blade installed under the selected angle, along the surface of the abrasive. In the process of work, the position of the roller is monitored: it should not be broken from the supporting surface.
Primary chamfer and cutting edge mod microscope
IMPORTANT: The microfas width should not exceed 1 mm. In the process, the finishes should be regularly verified at what stage the tool is found. Otherwise, it will be necessary to re-form a chamfer.
How applies sandpaper tool sharpening
For work on a sharpening machine, sandpaper 220, 320, 600, 1200 grit is used, for finishing - within 2000-4000. Revision (polishing) is of great importance for wood tools: acute edge efficiently handles the material and not so quickly stupid. Sharpening method is as follows.
- The material with a solid and flat surface is selected (it can be a piece of granite slab, thick glass, laminated chipboard or ordinary wooden bar). It is more convenient to use a 75 × 200 mm bar.
- The sandpaper passes on the bar. Several bars are manufactured with different abrasives grain.
- The device is placed on the workbench over the rubber gasket (for stability).
- The tool is installed at an angle of 25-30 ° for chamfering. With a moderate pressing blade moves along the plane of the bar.
- The blade with another number of abrasive is performed.
- The back side of the cutting tool is polished (the plane near the cutting edge is 10-12 mm width).

All advantages and disadvantages should be known:
- cheap: Emery paper and glue for making tools will not require significant expenses;
- availability: The necessary materials are in any construction store;
- after draining the tool, there will be no dirt on the workbench;
- fast emery wear requires its periodic replacement.
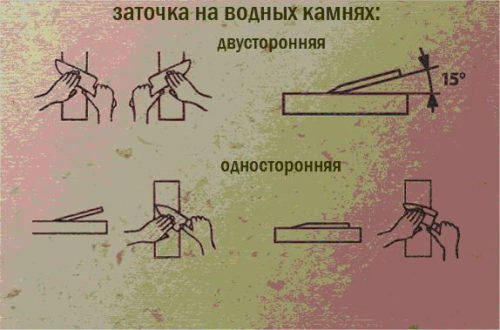
Sharpening tools with aquatic stone
For work it is necessary to have at its disposal abrasives with graininess of 1000, 4000, 8000 grit. The technology provides for the processing of the cutting edge using three stones.
Tip: Reduce costs can be if you purchase combined stones whose sides have different graininess.
The features of the method are as follows:
- before dragging the tool, the abrasive must be soaked (immersed in water for 15-20 minutes);
- in the process of work, the stone should be periodically moistened;
- the finishes begins with the processing of the blade with a stone of 1000 grit, after which they go to 4000 grain, and then 8000 grit.
It is important to know: Abrasives with graininess of 1000 and 4000 grit can be kept in water for a long time, but smaller can come into disrepair.
The bad, and what is good method.
- The service life of the aquatic stones is small. The surface of the abrasive must be periodically aligned to eliminate the furrows.
- For refinement tool on water, a lot of time is required.
- Water for wetting stones should be periodically changed to avoid pollution of the workbench.
- Wet stones after work should be keenly dry in the warm room. In the cold, they can collapse.
More details with the process of sharpening the tool on the water stone can be found, watching video.
Sharpening tools with diamond plates
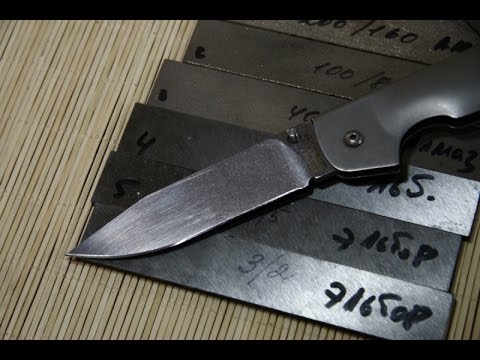
Diamond plates for sharpening
Diamond plates are designed to sharpen the cutting edges of tools made of solid stamps. In practical use, two-sided plates are comfortable, 190-200 mm long grain grain 600/1200 grit. Work with them for certain rules.
- A flat chamfer is formed with a plate with a plate with a grain of 600 grit, the finishes are performed by a 1200 grit abrasive.
- The plate is wetted with water.
- The blade of the sharpened tool is located relative to the abrasion at an angle and moves along its plane. Sewage particles of metal accumulate in special holes of the steel substrate.
Tip: Special oil has proven itself as an anti-corrosion product, but it is not effective for lubrication. It is recommended to replace oil with water (the surface of the abrasive will not be so rapidly dirty). After use, diamond plates need to dry.
Sharpening Tools: Useful Tips
In the process of work, plumbing and carpentry tools are stupid, and work with them becomes less efficient. The quality of surface treated surfaces is worsen. It is necessary to the timely and correct drainage of the cutting edges.
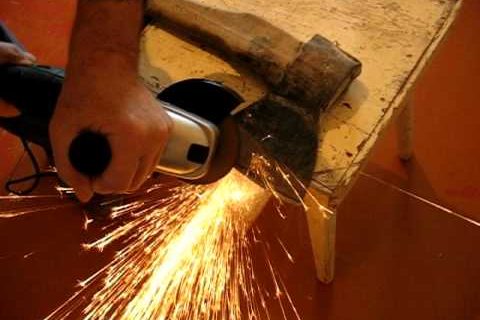
How to sharpen the ax do it yourself
Axes with a straight blade require the cost of strength, and they are climbing chip. To put the work tool in order, during sharpening it is necessary to consider the following.
- The scope of use: the ax may be carpenter, fishing or can be used as a kolun.
- Material for processing which you need an ax (breed and variety of wood, its humidity).
- Metal brand from which an ax is made.
Depending on this, the shape of the edge of the ax blade is selected, which can be:
- oval (for rods and wood cutting);
- razor (for accurate carpentry work);
- wedge-shaped (universal type of edge for an ax suitable for rods and to align the wood surface).
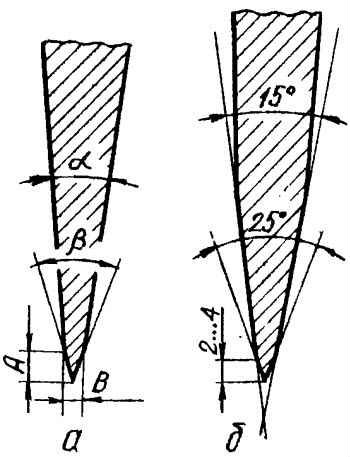
The technique of sharpening an ax used in everyday life provides for the processing of the blade in two stages.
- Primary sharpening: The chamfer with an angle of 15 ° is formed.
- Rendering: A cutting edge is formed with an angle of 25 ° (for household instruments).
During the drainage process should be avoided:
- overheating blade;
- shifts of the sharpening tool;
- skewing and weak fixation of the abrasive circle;
- use of a circle with uneven wear;
- the shaft of the electric motor sharpened.
Nuances sharpening saws
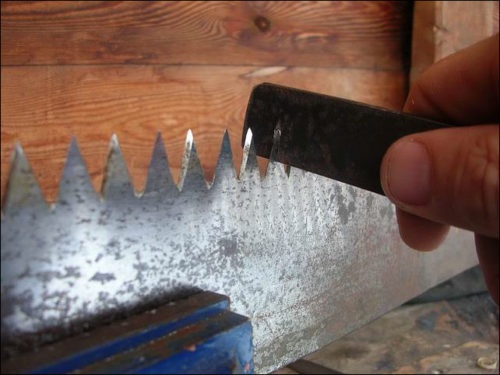
Sharpening teeth saw
Before you sharpen a saw, you need to check the divorce of the teeth. If necessary - to dilute them so that through one tooth the slope was in different directions. After that, the teeth are sharpened on one side. The cutting edge should be directed towards the handle.
Cut the drills with your own hands
The drills that are used for metal processing are faster. The cutting edge of this drill can be restored.
The main points for which you need to pay attention to:
- the crooked edge must be in the same plane with the axis of the abrasive stone;
- during operation, you should moderately press the abrasive drill;
- it is necessary to monitor the formation of the edges: they must be the same length.
There are two types of sharpeners.
- Single bed (for drill with a diameter of up to 3 mm). The drill moves parallel to the working surface of the sharpening circle.
- Conical (two-dipled). The drill is brought to the abrasion at an angle and swaying from side to side. The method is suitable for drills with a diameter of more than 3 mm.
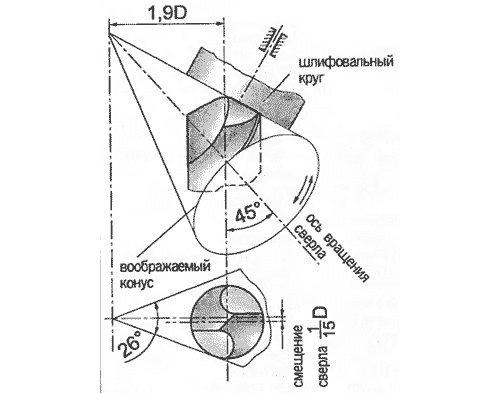
Conical sharpening drill
Rendering is performed on a soft stone.
Tip: To drain the drills, we use special devices (machines), allowing you to securely fix the tool at the desired angle.
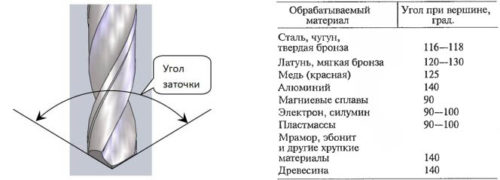
Sharpening angles may differ depending on the metal for which they are intended
How to sharpen the chisel and the plans
In order to perform work quickly and efficiently, you should use some tips.
- Before draining, the abrasive circle or bar must be placed for several minutes in kerosene.
- The blade of the chisels or the planer is kept up to 30 minutes in the solution of the cooking salt.
- You can use a homemade grinding machine, which can be made from the old electric shaver. To do this, instead of knives, an metallic plate with bleached grinding paper is installed.
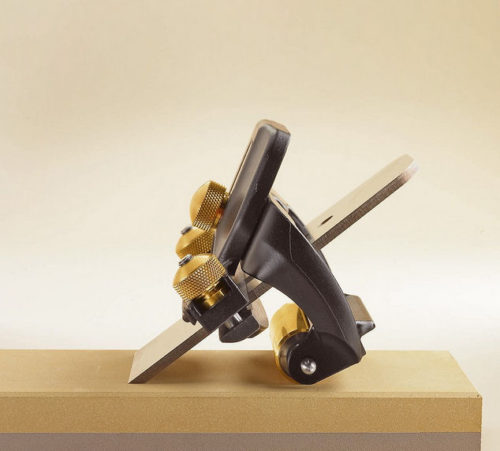
Tool sharpening device
Errors when sharpening the tool
During the sharpening of the instrument performed in different ways, the listed errors should be avoided.
- It is necessary to periodically interrupt the process and cool the blade in water. Otherwise, overheated metal (this can be recognized by color change) becomes fragile. As a result, sharpening has to be renovated, and this leads to premature tool wear.
- The fixation of the flavored blade is not enough. It is important that the machine is installed on a massive, well-fortified bed (workbench), which should remain fixed during operation.
- The abrasive circle should sit tightly on the shaft of the electrician. Its skews, excessive and uneven wear, as well as the shaft beating are not allowed.
- It is not recommended to sharpen a small tool on a circle intended for wide blades. Narrow grooves on the abrasive will interfere with high-quality metal processing.
Finally - video tutorials at sharpening tool.
Calculators


Correct tool sharpening. How to sharpen the tool with your own hands 29.01.2017
In the process of operation, the cutting edges of the instruments are stupid, which leads to a decrease in the quality of processing parts and blanks, to a decrease in labor productivity, as well as to the wear of the tools themselves. Right ...


Themed photos