Plaster for lighthouses do it yourself Construction
Plaster - one of the ways to align the surface, wall decoration and ceilings. The plastered surface can be painted, lined with tiles, is saved by wallpaper. In order to bring the walls and the ceiling of your home in order, do not necessarily invite specialists. After studying the basic rules and bases of technology, you can do this work on your own.
Content
About the types of plaster
Distinguish the following types of plaster.
- Soil: Creates a relatively smooth surface prepared for cladding or trim. The requirements for tone excerpt is not presented.
- Finishing: forms a smooth monophonic surface, on top of which glossy enamels can be applied.
- Protective: Designed to protect brick walls of cellars from dampness. Must have good waterproofing properties. The quality of the requirements is not presented.
- Outdoor: It has mechanical strength, wear resistance, resistance to high humidity and chemically active substances. The main component is cement.
Plaster should be durable on the base and be smooth. To achieve this, the prepared mixtures are applied in three stages.
- Spray: A method that allows you to obtain good decisions of the solution with the base.
- Application of soil, which creates a solid surface for the next layer.
- Outer layer (cover): Apply to obtain a perfectly smooth and smooth surface. To obtain such an effect, plaster walls for lighthouses.
Choosing a plastering mix
Preparation of plaster mixtures in place has long gone to the ready-made mixture. In addition to the lime and cement, they include polymer additives that ensure the stability of the properties of the material. The most famous brands: German mixture of Rotband, domestic plaster, Volmasla. There are the following types of plaster mixtures, differing in composition and, accordingly, on purpose.
- Clay. Designed to shock fireplaces and furnaces. In addition to clays, contain limestone dough in an amount of 0.3 parts of the total volume and 1 part of quartz sand. Before use, it is pushing through a sieve with a cell of 5 × 5 mm.
- Lime. It is used to finish the walls of dry premises. The advantage is a relatively low cost of components (limestone dough, sand and cement grade 200) and long service life.
- Cement. In terms of its composition, no difference from the masonry. When preparing, the proportion of sand relative to cement is selected from 1 to 6. The proportion depends on the base material for the plaster mortar: for brick walls it is necessary to mix 3 parts of sand with 1 part of cement, and for walls of smooth concrete - 5 (6) sand parts . The addition of limestone test is achieved by the desired fat.
- Gypsum. Plastic, environmentally friendly material, not prone to shrinkage. Allow the plastered surface to "breathe", possess good moisture and frost resistance. Manufacturers offer ready-made plastering gypsum mixes for external and internal work. Also the starting mixtures and finishing are also distinguished.
Stuccoings of walls by lighthouses do it yourself: process technology
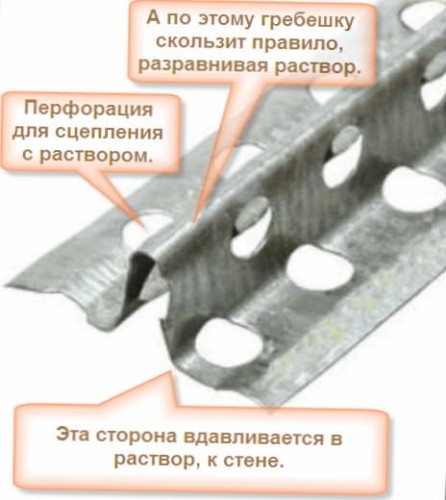
For work, lighthouses are needed under the plaster, which are metal profiles with perforated holes. Profiles with a length of 3 m are manufactured, with a ridge height - 6 or 10 mm. The choice of profile depends on the thickness of the plastering layer.
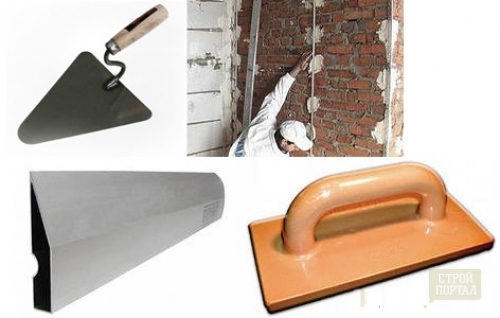
The plaster for beacons with their own hands is performed using the following tools and devices:
- rule (perfectly smooth aluminum rack with a pointed edge);
- light profiles in the desired quantity;
- perforator;
- mixer (nozzle of a special form for mixing the solution);
- screwdriver figure;
- dowels and selflessness;
- waterpas (construction level);
- scissors for metal;
- hammer;
- plumb;
- roulette;
- spatula wide, Kelma, bucket;
- angular spatula;
- stroited;
- bath and roller.
It is necessary to have acrylic and primer at its disposal for concrete (smooth) walls, as well as protective gloves.
Preparation of walls
Plastering walls under the lighthouse requires the implementation of preparatory work. Technology provides the following sequence of actions.
- Using the level, you should check the walls and determine how large their deviations from the vertical. The most pronounced irregularities should be noted by a piece of chalk or a marker.
- The next stage is the markup of the base for lighthouses. In order to qualitatively, cement or plaster plaster was applied, lighthouses should be installed correctly. From the corners of the wall, about 300 mm are retreating and two vertical lines mark. For a two-meter rule (for example), the distance between the beacons should not exceed 1.6 m. We divide the wall to the appropriate parts, and the residue (if exceeds 2 m) divide in half.
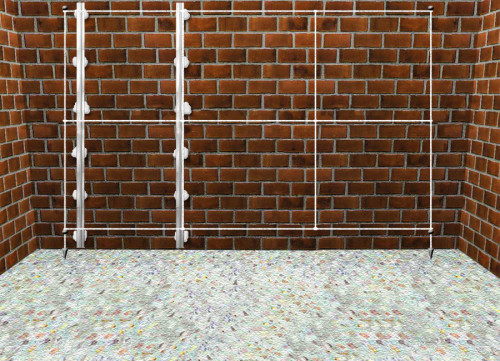
- Apply horizontal marking. From the surface of the floor along the vertical markup line on the edges of the wall, we measure 150 mm up and install in the obtained points of the dowel. Between the dowels, we pull the cord and mark the intersection points with other lines of vertical marking. In the obtained points, we also install a dowel. From already installed dowels, I repente 2450 mm again, we make marks, drill holes and install a dowel.
- Carefully process the wall by primer: as a result of this, the microparticles on the surface of the base firmly glue with each other, forming a solid foundation. The clutch with the solution will improve significantly.
- In the lower and upper holes insert the screws and adjust them to dupile in such a way that their caps are on one vertical line. Conduct control using a plumb.
- We set the screws into the rest of the dowels and regulate their dupile with the cord, stretched between the extreme, already exhibited by self-draws. We use for this as the same rule. Check the vertical plumb or level.
- Lighthouses are shortened in length (if necessary) and, applying to self-drawing, "fit" them in several places thick plastering bumps. The solution should not be over the limits of the profile ridges, you should clean too much.
- Periodically check and, if necessary, correct the position of the beacons during the first hour. The solution must completely dry before it can be proceeded to work.
Technology applying plaster
The plaster is cement for lighthouses (as well as plaster and others) is applied to the wall in accordance with the following rules.
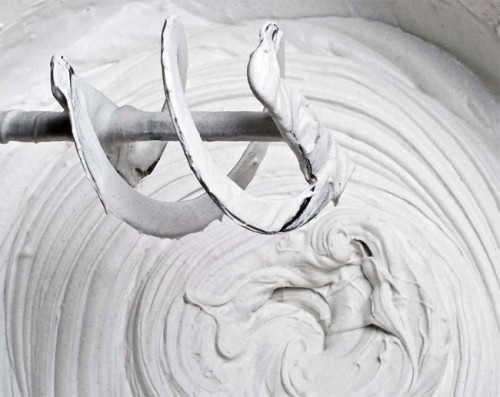
- In accordance with the instructions on the package, we prepare a solution with the desired density, which is selected depending on the method of application. For a thick layer, the consistency of the solution must be creamy, otherwise it will not hold onto the spitel.
- If the sample indicates that the wall strongly absorbs moisture, it is necessary to moisten it.
- We recruit the solution on a wide spatula.
- Colevma or bucket threw a solution on the wall between two adjacent beacons so that the entire volume is filled.
- Rule Remove the excess solution from below-up. Keep the tool must be perpendicular to the beacon profiles, otherwise too much solution can be removed. I repeat the operation several times, as a result of which the entire surplus should be removed.
- External and internal angles are plastered with angular spatulas.
- A few hours later, when the solution clings, the beacons should be removed. In the event that it is planned to clamp a wall with ceramic tiles, lighthouses can be left.
- After complete drying of the solution, we perform a grout. Initially, we moisturize a small portion of the plastered wall, after which we fill the emptiness with a liquid solution with a liquid solution after removal of beacons, small cracks, eliminate irregularities. The solution is superimposed by small portions, while the ironing should be brought to the wall at an angle of at least 45 degrees. The tool must be made with clean water.
- Gypsum plaster is grouped, processed by primer. Now you can apply paint.
Important: the primer must dry at least 12 hours, otherwise its effectiveness will be reduced.
Stucco Ceiling for Lighthouses
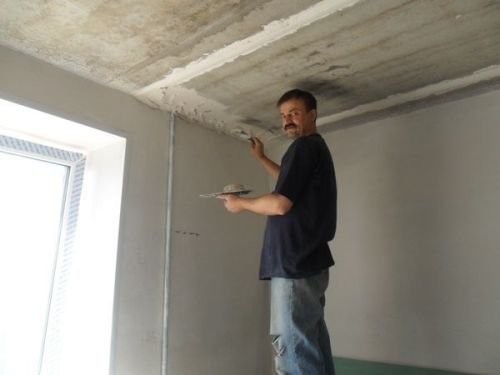
The principal differences from the above-described process when applying a solution on the ceiling is not, but some features should be considered. For example, consider a typical situation: the ceiling in the apartment is a few plates laid with a drop horizontally in 2-3 cm, and between the plates - wide seams. You can align such a surface in several stages. The sequence of actions is the following.
Preparatory work
- Get rid of the layer of old plaster. Plates of overlappings must be completely cleaned. To do this, you can use scrapers and drill with a brush nozzle. It is not recommended to flush water: afterwards it will worsen the adhesion of the foundation with a new solution.
- We proceed the basis of the primer for smooth walls. After that, the ceiling must dry at least 12 hours.
- The ceiling markup is performed to set the lighthouses. It is convenient to use the laser level: it will help determine the lower overlap point.
- At a lowest point, retreating from opposite walls about 150 mm and as much from a wall longitudinal to the beacon profile, drills the holes under the dowel. We stretch the cord between them and drill a few more holes under the dowel along the cord line.
- Insert the screws in the dowel. You don't need to screw them up to the stop: With the help of a screwdriver, adjust the fusion caps so that the profile crest occupies a strict horizontal position as close as possible to the base.
- Fresh a beacon profile with a thick plastering solution, which is pushing through perforated holes. The profile at the same time should be tightly cuddled to the hats of self-tapping screws. The solution should not exceed the profile ridges.
- With the help of a cord and laser level, we exhibit other beacons. The distance between them should be smaller lengths of the rules (and not more than 2 m). Periodically check (if necessary, we correct) the horizontal of beacons and finding them in the same plane, applying the rule across their direction and diagonally.
- After drying the fastening solution, we stick the gaps between the plates of the reinforcing grid. It is also necessary for reinforcing the part of the ceiling, where the thickness of the plaster layer will exceed 20 mm. The reinforcing mesh is placed in the middle layer of plaster.
Applying plaster layers
To your attention the plaster on beacons: video, clearly demonstrating the whole process.
Phased work technology can be described as follows.
- Cooking a solution using instructions on the package.
- We recruit a solution to a wide spatula.
- Starting stucco in a wide place, and the edges - last. Pick the solution on the ceiling. Initially, you need to get a thin layer of plaster, and therefore the amount of the fallen solution should be dosed. It is important to accurately calculate the strength of the throw so that the solution is well cloudy with the base.
- The reinforcing mesh with panels slightly pressed into the solution.
- Reduce the solution again, trying to fill the entire volume limited by beacons. At the same time, the skill of plaster plays an important role: the more precisely it will determine the amount of solution and sketches it, the less surplus will have to be removed.
- Using the rule, the excess solution is removed.
- After the plaster grabbies, carefully remove the beacon profile. The remaining emptiness fill with putty.
- After complete drying of the ceiling (after 48 hours) with a liquid solution using a smooth and wooden grater, we perform putty: eliminate small irregularities and defects. The tool must be periodically wetted with water.
- Small-dispersed sandpaper polished the surface of the ceiling.
- We process the stucco with the primer. Now the ceiling is ready to apply decorative coating.
Using the tips and the rules given in the article, you can shook the walls and the ceiling in your home with your own hands, while saving a lot of money.


