Warm floor in the bathroom with their own hands Floors

The bathroom is a special room that dictates increased requirements for finishing materials and surfaces. Only competent design will make it possible to make it a truly comfortable and cozy place where you can relax after a working day. The floor in the bathroom must be non-slip and the most warm. The best way to achieve this is to pave special heating elements under the floor covering. In this article we tried to include maximum useful information on how to make a warm floor in the bathroom with your own hands.
Content
Choosing a warm floor
There are several types of warm floors, each of which is characterized by its specificity of installation and operation. However, whatever the form you choose, the result will justify all expectations - the floor will be warm to the touch and will become an additional source of heating of the room. However, arguing about warm floors as a simple pleasant supplement would be too narrow. Their value is much more important than it seems at first glance. Imagine that after half-hour bliss in a hot bath, you become planted legs on a cold tile. At this time, the body gets micro shock. Since childhood, many are familiar to the rule to keep the legs in warmth, so as not to get sick, so the warm floor in a better sense protects against the cold.
The disadvantages are also present, but it is difficult to call them seriously. Thus, the cost of the warm floor is relatively high, but once spending, you can subsequently save on heating. In addition, after reading this article, you can actually save several thousand on the installation of warm floors in the bathroom.
So, what are the variety of underfloor heating:
- Water - the system is a plastic, PVC or copper pipes of small diameter, which are laid on the floor surface in a certain order. When the pipes starts to flow hot water, they heat the floor. In fact, this kind of battery, just for sex. With the help of the thermostat can be adjusted temperature. There is such a system is relatively inexpensive, different absolute security and ease of installation.
- Electrical - due to installation of the unit and the relatively low cost of this type of underfloor heating is the most popular. Special heating cables mounted on a concrete floor or directly on top of the tiles, and then close the thermal insulator and the finished floor. Electric fields are perfect for the bathroom, because just designed for small spaces. Some stops dubious environmental friendliness as a weak electromagnetic radiation, as well as higher operating costs (electricity prices). With the last bet hard, as tariffs are growing every year, but the radiation of electric fields is even less than that of the microwave, so there was no danger.
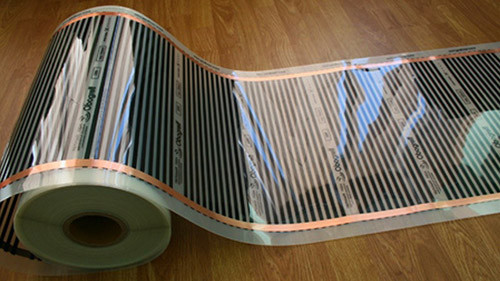
- Infrared - also known as film, because they look like a film from the heating sensor. This is the "youngest" type of floor heating, which is relatively recent. Its main advantage is the compactness, high efficiency and versatility - the film can be installed even on the walls and ceiling. Also, the infrared does not require laying the floor covering, so costs are reduced significantly. The elements and electric floor film not connected in series and in parallel, which ensures stable operation of the system, even if one segment is broken.
How to make a water floor
Let's start with the installation of water floor heating in the bathroom. It can be closed with a concrete screed, tiles or wood flooring. Bath is still better to choose tile, placing it on the aluminum sheets and cardboard lining. However, if the room is installed good ventilation, you can make and wooden floors, as the tree warms better and more pleasant to the touch.
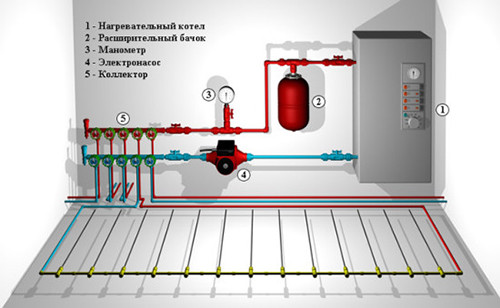
The warm floor of heating in the bathroom consists of a thermal insulating layer, special pipes, fasteners and reservoirs with fittings, with which the system is connected to a common heating network. Before mounting the heating elements, it is necessary to pre-lay waterproofing. As a result, the floor level will rise by about 6-7 cm, which should be taken into account in low ceilings in baths.
The image is demonstrated in the image above. As you can see, it is simple: collectors are connected to a heating boiler by means of pipes. One collector takes hot water from the boiler, the second takes the cooled back. Also, the scheme shows an expansion tank, an electric pump and a pressure gauge - these parts are not required to maintain water floor, but can facilitate its maintenance. For installation, it is only necessary to put the pipes and connect them to the collector, and it, in turn, lead to the heating system of the house.
Installation of warm floor in the bathroom:
- Take the place to install the collector. There you can put a panel for the temperature control of the floor in advance.
- Send the floor marking by sectors of about 40 cm², which will allow you to take the screed deformation in the heating process. The calculation of the system is more convenient to do on a conventional notebook sheet into a cell or a millimeter. On a comfortable scale, transfer all pipes available in the bathroom to accurately calculate the number of materials.
- Place the waterproofing film on the floor, making the walls on the walls at 15 cm. Cuts of the film between themselves fasten with a wide scotch.
- Necessing the pipes are not close to the walls, but with a small indentation, since these places are practically not used and the full heated of them. Thought in advance where furniture and technique will be installed - the floor is also meaningless under them. As you can see, the correct planning allows you to save funds for the purchase of materials.
- Place the thermal insulation layer. It can be a foam, extruded polystyrene foam either penplex. The advantage of these insulation is that they are not afraid of high humidity and retain heat in the room. Do not neglect this step, as thermal insulation under water floor allows you to significantly reduce heating costs.
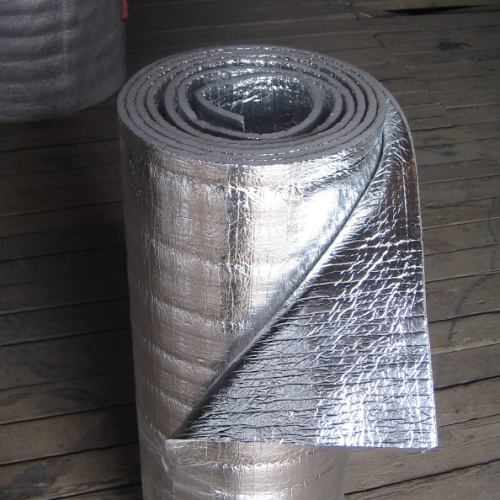
- Eliminate the floor to a one-sided foil substrate, which will reflect heat and will not allow it to go into a concrete tie. The brilliant side must be addressed up. Substrate cuts Connect aluminum scotch.
- All over the perimeter of the bathroom, glue the damper tape - it compensates for the thermal expansion and movements under the concrete tie.
- Place the reinforcement grid for the floor. It is needed for fixing pipes.
- Getting Started with pipe laying. The image below shows the laying methods that are used most often. Between the pipes should remain from 10 to 40 cm, and the distance to the wall is at least 8 cm.
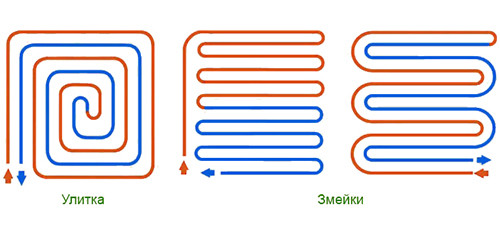
- To attach pipes to the grid, use plastic clamps, clinging them every 90-100 cm. Do not tighten them too much, because the pipes from heating will be slightly increased in diameter, which will create a strong voltage and entail the deformation of the system.
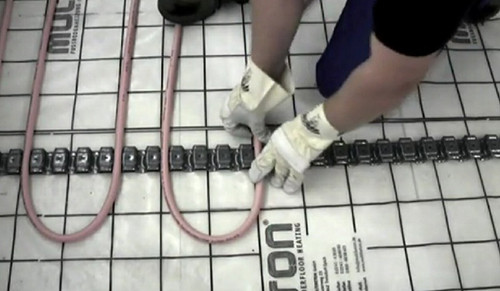
- After laying pipes, you can connect them to the collector. Dinet one end of the pipe with the yield of hot water, and the second - with a return hole for the cold, then fasten them with special nuts.
- Each contour should be approximately 50-60 m (the length is determined by the power of the heating system). If the pipe is located near the deformation seam of the screed, hide it into the corrugated tube.
- After the installation of the installation work, check the system performance by turning on the boiler for all power. In the pipe, water is under strong pressure exceeding the usual 1.5 times. During the test, carefully inspect each site for leaks, follow, whether the pipes are not shifted. Test warming should last at least 2 hours.
- Now you can proceed to the pouring of concrete or laying the tile. The thickness of the screed over the water floors should be about 3 cm. In the process of filling the cement-sandy or leveling polymer mixture in the pipes, cold water should flow.
If you mount the water warm under the wooden flooring, then the pipes should be lagged under lags. The screed in this case is not needed. It is sometimes easier to use in this way, however, the concrete screed gives a better and durable result.
See how to make a warm floor in the bathroom in video instructions:
Installation of electric floor
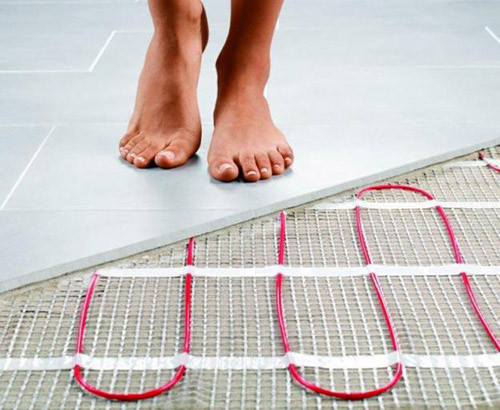
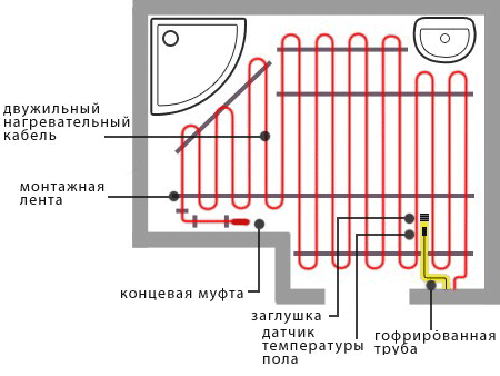
The electric floor is designed for heating small rooms, so perfect for the bathroom. The system is a set of electric mats consisting of a mesh film and a heating cable. Cables can be single-core and twin-housing. The latter are more expensive, but differ in high security.
The kit also includes a thermostat for changing the heating temperature of the floor and connecting wires to connect to a common electrical outlet. However, the equipment may differ depending on the manufacturer. So, sometimes the kit includes corrugated pipes and bilateral tape. If they are not, you will have to buy yourself. It is also recommended to purchase a foil foam reflective film.
How to put electric warm floor in the bathroom:
- Prepare the surface by dismantling the old coating and thoroughly aligning it. Electric mats need to lay on a smooth and clean floor. If there are potholes on it, close them with a putty or cement mortar. Supports can be tried to fighten with sandpaper. If defects are too strong, you will have to do an alignment tie. It can be performed using a classic cement-sandy solution or quick-drying mixture with polymers. More information on this topic can be found in the article "Coupling for a warm floor: manufacturer's features".
- Take a plot on the wall for the subsequent installation of the thermostat. If necessary, make a separate wiring for connecting the warm floor. Installation technology provides a separate output for a device from the electrical tailor.
- Place a foil foam on the floor with a brilliant side up. Cut joints Clean aluminum assembly tape. Place the thermal insulation, without bringing to the walls by 5-10 mm.
- For installation, use a special adhesive tape. In some cases, cables are sold already on the ribbon. They are produced in rolls and immediately ready for laying. The tape in this case does not allow the cables to be overtaken and retains the distance between the loops. If you have only a cable, then it will take a special grid for it. Place it with zigzags, withsting the distance between the turns of 20-25 cm.
- When the heating mat must be rotated at an angle, cut the mounting grid, set in the desired position and continue to glue the cable.
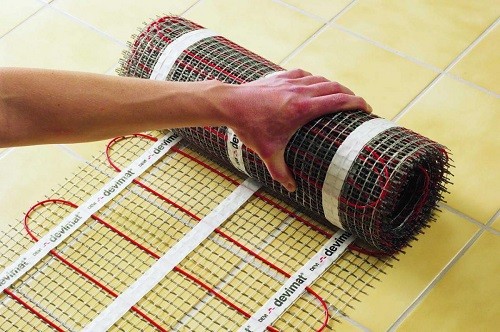
- For ready-made sets, as a rule, you do not need to install the thermal sensor, but if you have taken all the details separately, then place the sensor so that it can be reached at any time. If you hide it under the tie, then in the event of a breakdown you have to destroy the floor. It is better to put it in a corrugated tube where the cable comes out.
- To mount the thermostat in the wall, do the opening of the corresponding sizes and pave a small channel under the electrocable. Connect the heating cable to the thermostat, and it is to the shared network. According to the technology, it is necessary to power the system from a separate entry in the shield, but, as practice shows, it is not always coming. The main thing is to correctly calculate the cable cross section according to the power of the warm floor. Given that on average, 1 m² accounts for about 150 W, the copper cable for 1.5 squares is suitable for the area of \u200b\u200b20 m².
- After laying and connecting, it is necessary to check the performance of the system, and only then begin to finish the floor. Submit voltage to the cable and measure its tester resistance.
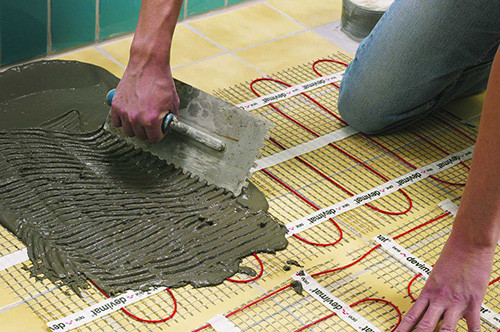
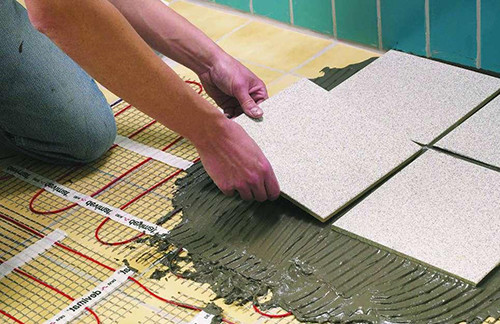
- If everything works, you can pour a screed with a thickness of 3 to 5 cm. The tile on the screed is laid as usual, with the only difference, which is used for fixing a special heat-resistant glue.
IMPORTANT: Warm floor in the bathroom under the tile can be included only a few days after laying the tile so that the adhesive should be dry. If you just made a screed without tile, you will have to wait for its complete drying. Otherwise, the concrete can be frozen unevenly, as a result of which the surface is cracking.
Step-by-step infrared installation
The infrared floor can also be attributed to the type of electric heating floor, only more modified, since the heating in this case occurs due to the film with carbonular paste in the composition heated on both sides of copper conductors. In order to avoid burning, contacts have silver spraying.
Before laying, make measurements, taking into account the location of the furniture in the bathroom and indents from the walls and corners - it makes sense to warm these sites. The power of electrical mats depends on the size of the area requiring heating. So, the floor of 220 V is suitable for a 20 m² room, and smaller power is needed for a more spacious bathroom. In fact, it is necessary only to make measurements correctly, and the sales assistant when buying infrared sex itself will overtake the appropriate option.
How to make a warm floor in the bathroom:
- Prepare the basis, thoroughly aligning it and clearing it. If the floor does not have pronounced defects, but the deviation horizontally is more than 3 cm, it is necessary to make an aligning screed.
- Make a hole in the wall for the thermostat and the groove for the cable, as in the case of an electric heat floors. It is better to do it before laying mats, then not to litter.
- De-in the system and move the power to the nearest outlet.
- Place the heat insulating layer from the foam foil side upwards. Suitable and non-reflective insulation. A cork substrate has proven very well. The only requirement is the thickness of thermal insulation should be at least 3 mm. Heater cuts to fasten the mounting scotch.
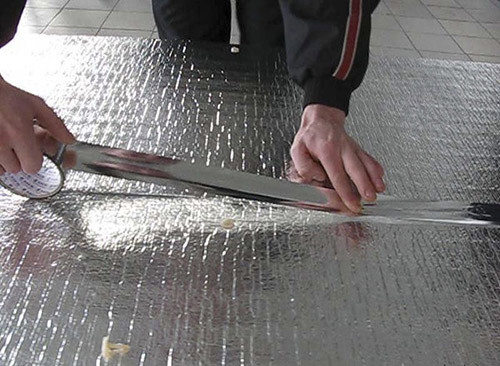
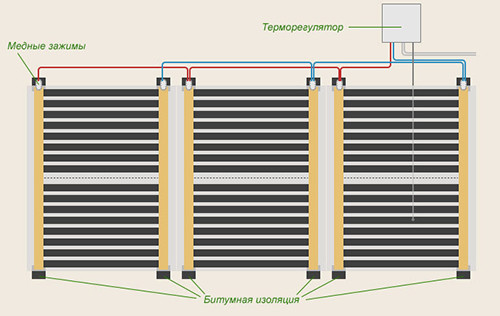
- Start laying the infrared film with copper heaters, moving towards the wall with the thermostat - this will reduce the length of the cable. When laying, observe the distance from the wall of about 10-15 cm. If there is a battery or other heating element in the bathroom, the indent must be increased to 100 cm. Cut the film if necessary (on turns) only on light areas located between dark sections.
- Place the frangments of the online film, then squeeze this place with scotch. Outputs where the wires will be attached, do not stick. Close the ends of sections with film bitumen insulation, placing copper areas on both sides. Slesh in insulation (foam or traffic jam) small deepening to "drown" in them copper areas.
- Attach metal clips to unclosed copper sites so that one side is placed between the film and the copper output.
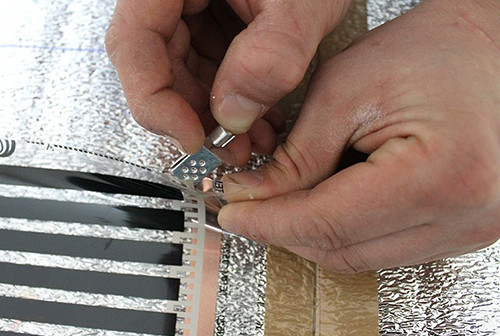
- Connect to the wire clamps, connecting the left and right side separately (parallel connection). For this it will be more convenient to buy wires of different colors in order not to get confused. Find the insulation at the ends, twist the tip of the wire and grind into the hole in the clima, after which it fade clutch the pliers. Finally, enclosite the connections with a tape.
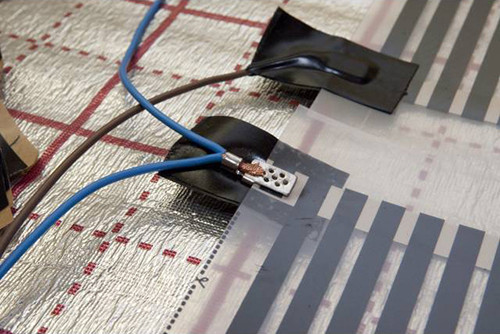
- Wires need to be put on the floor to the wall and ideally hide under the plinth. To maximally safely bring the wire to the wall and do not expose it to the pressure of the floor covering, cut the groove in the insulation of the appropriate width. Drink in it the wire and creek the top of the groove so that the insulating casing of the wires also adhered to the isolate. Similarly, do with the rest of the wires and move them to the thermostat.
- Install the thermal sensor under the film closer to the center of the second section, cutting the hole under it in the insulation and the base, if necessary.
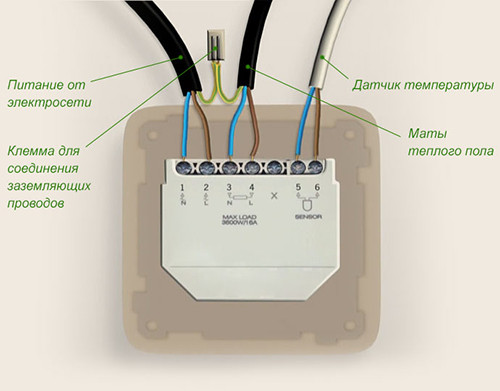
- Spend a test system test. If everything works, you can lay waterproofing and finishing coating. The big advantage of infrared sex is that it does not require laying a wet screed - you can completely do dry and save a lot of time and strength. But for infrared warm floor in the bathroom, it is wisply to use a bulk coating, resistant to humidity.
Laying of warm floors in the bathroom is expensive, but it allows you to forget about cold and discomfort once. This is a great way to make a house or apartment more cozy, even if on the street of Lyuti frost.


