How to build a naked roof Construction
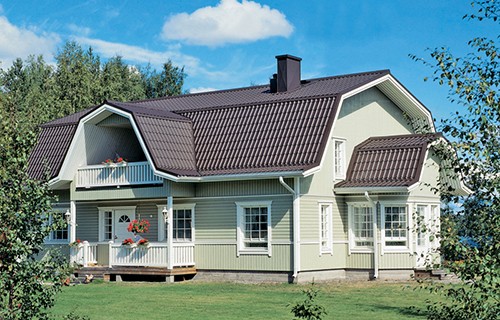
In the growing demand for suburban accommodation, there is one problem: how to use a relatively small area with maximum return? In solving this issue, the construction of an attic floor can solve the problems of additional areas, and give the house modern, stylish look.
Content
A mansard broken roof, like any construction, requires a planned approach and calculations.
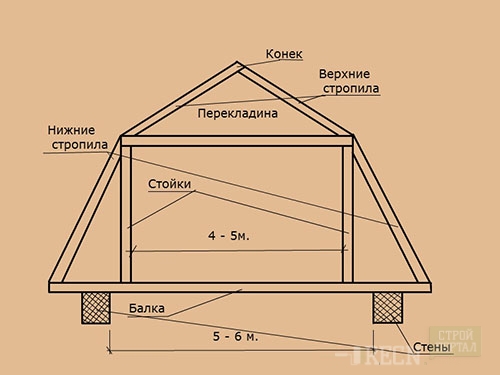
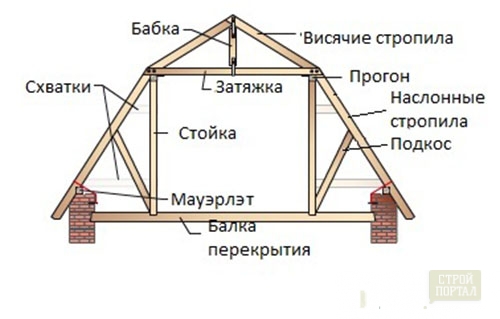
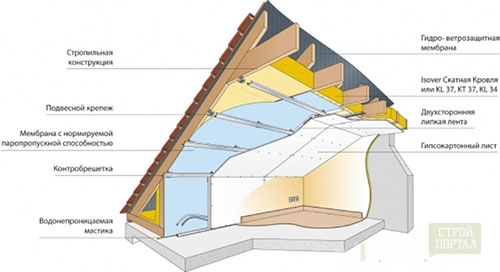
Scheme of the attic roof
Of course, the calculation of a naked roof is better to charge specialists. Calculation on the "peephole" can lead to sad consequences in the form of a collapsed roof.
You need to know what materials should be used. Calculate on stability to wind and snow load. This is relevant for our country, where the snow lies for several months a year.
The article will cover the general principles of building a naked roof of the roof with their own hands, consider which parts are the roof, which materials are used.
Mansard design
The design of the nuclear roof structure consists of two parts: the upper range of the part and the bottom is steep.
Thanks to the use of such a design, the internal volume increases and, accordingly, the comfort of accommodation in such a room increases.
At the applied figure, the rectangular opening is visible, to which inclined rafters are adjacent, forming a steep part of the roof and are visible to the upper rafters, forming a smooth scath and horse.
How is the attic roof
The design of the nuclear roof structure should be contained in the drawings and specifications of project documentation. It necessarily indicates the material from which it is erected. But if the desire to build independently won, it is necessary to know that the rafters should be made of wood coniferous rocks, and wood dried to a state of 8-12% humidity. Otherwise, the whole design will certainly behave. All applied wood is processed by an antiseptic.
The construction of a naked roof is a responsible and serious event. When it is required to use a good tool and fasteners.
Note: Before starting work, it is advisable to make a stock of a long coniferous timber.
Stages of the construction of the roof
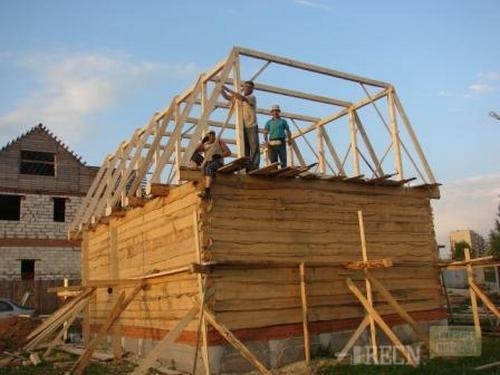
- Erecting the rafter system.
- Laying hydraulic and thermal insulation between the attic and the lower floor.
- Mounting the crate.
There are several ways to fasten to beams. Many in the old manner use metal brackets. Recently, high-strength bolts GOST 52644-2006 have appeared on the market, which are more convenient than brackets.
When assembling a rafter system, it is necessary to remember that the step between the rafters must lie in the range of 600 - 1200 mm.
Creating a carcass
- The rafter system of the attic lone of the roof begins with the formation of Mauerlat. As already noted, it is a wooden bar with a cross section of 150x150 mm.
In the top of the wall laminated a timber. It is placed on an anchor-pinned in the wall with a diameter of 10 - 12 mm, or in a specially prepared concrete strengthening (concrete belt). Holes for the bolts should be drilled so that they do not fall into the place of the future connection of the laid bar and rafters.
- From the bar of equal to the cross section of the one that was laid around the perimeter of the wall, vertical racks are installed. They are installed in the front of the building. The result of this assembly should be the arches, which will be the basis of all designs.
To check the "verticality" design, use a construction plumb.
- Between the installed arches, pull the cord. It is located in a horizontal plane. The rest of the arches is installed on it. The arches are installed in a step that is selected for rafters. To increase the stiffness of the arch design, the 2x100 boards are connected to each other or 50x50 bar.
Setting timing
- First of all, the lower rafters are put. To do this, cut the groove in the rafter, which will fix it on Mauerlat. The upper part of the rafter feet is cut at an angle and attached to the arch. Fixation is made by self-drawing or nails.
- The installation of the upper rafters must be performed particularly carefully. To do this, it is advisable to make a template for which the remaining rafters will be made.
- We make the upper rafters template. On one of the extreme arches, the bars are exhibited, which will serve as a support for a slight part of the roof. According to the templates marked, the remaining top rafters are manufactured. The fixation of the upper rafters is also carried out by nails or self-drawing.
Isolation arrangement
Unlike all other premises in the house, the attic carries a large heat loss. It is exposed to atmospheric phenomena - snow and rain. This is exactly what causes the need for a competent arrangement of heat and hydraulic insulation of the roof. For insulation, the roof is used materials like basalt or mineral wool. Polyfoam and other polymer materials are also actively used. Depending on the region arrangement region, the thickness of the heat insulation layer can be from 100 to 250 mm.
Hearth roofing
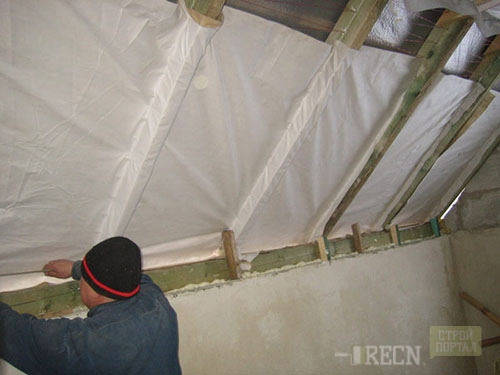
- The first step is to strengthen the layers of polyethylene or foil, to provide vapor barrier.
- The second step is to lay thermal insulation from the inside of the roof. Remember that the gaps between the insulation and the rafters should not be.
- Third step - installation of crates from the inner part of the roof.
- The fourth step is to strengthen polyethylene or foil to ensure the protection of the insulation from moisture penetration.


