How to put laminate with your own hands Floors

Increasingly, when placing floors in residential buildings, a fairly new thing is used, but the material has already been loving - laminate. Most of all attracts an external similarity with wood. The material is very practical, resistant to moisture, has excellent noise insulation properties. Compared to the tree, it wins significantly in price, and the ease and simplicity of laying add to him popularity.
Content
Something about laminate
Panel Device
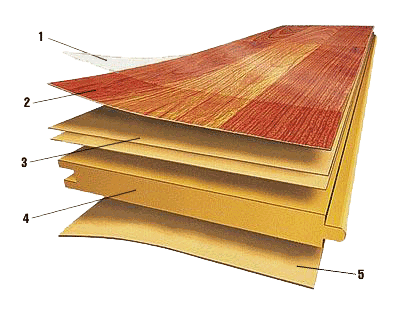
Laminated board is a multi-layered design. The lowest layer is made of durable paper impregnated with resins or paraffin, which makes it resistant to moisture. The layer of the second is a fiberboard impregnated with a special composition making it durable, moisture resistant, as well as incapable of fire. The next layer is the same as the first. They both unfold fiberboard, protecting against moisture and giving structures strength. Next comes a decorative layer, asking drawing, color and texture. It is made of special furniture paper. On top of all this is applied a dense layer of melamine or acrylic resin. It is designed to protect the laminate from the damage to the mechanical nature - scratches, scratches, chips, as well as from the effects of moisture. 
What to pay attention to
- Depending on the strength, the laminate is divided into classes. The class is higher, the material is stronger and, accordingly, more expensive. So, classes 21, 22, 23 are quite suitable for residential premises, and classes 31, 32, 33 - for commercial.
- It is impossible to lay a laminated coating in the rooms whose humidity can exceed 50% in bathrooms and toilet rooms, in the kitchen.
- The material is placed only on the perfectly smooth floor. It can be performed a screed for laminate with your own hands. A wooden floor, a linoleum or a concrete surface is suitable as a cape.
How to lay a laminate yourself
Basic laminate laying rules
Laminate laying with their own hands will not be difficult if you consider the basic rules and in time to acquire everything necessary. Let's start with the fact that the laying can be produced in two ways - classic and diagonal. The diagonal method is used mainly when you need to visually expand the space. The panels are starting from the angle of 45 (sometimes under 30) degrees. This method is considered rather laborious and expensive. The classic method is more common. It lies in the fact that the laminate panels are stacked perpendicular to the light source and parallel to the wall. It is with this location that the junctions between fragments will be less noticeable. This method allows you to somewhat saving the material. If the laminate is put on the perfectly smooth concrete basis, a special substrate is necessary. Natural tube or made of coniferous wood, has a fairly high price. An economical option can be a propylene substrate. When using a cork or pine substrate, add a polyethylene film with a thickness of 100 microns, as a vapor insulation layer. Thus, the entire process of laying consists of four main steps:
- Alignment and preparation of the foundation
- laying film and substrate
- Laying laminated panels
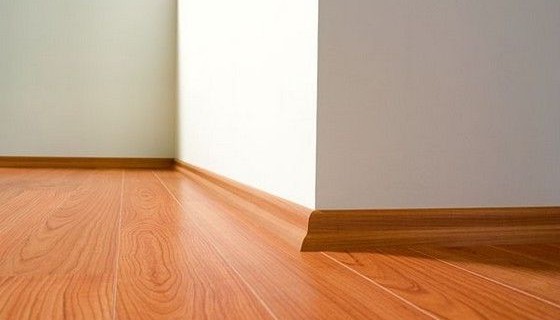
- Installing thresholds, plinths.
Calculation of materials
It is important to correctly navigate and purchase the required amount of necessary materials. When diagonal laying, the laminated board will need 20% more than the area of \u200b\u200bthe room requires. To find out the amount of material, we measure the length and width of the room, we turn these quantities and add 20% to them. This will be the area of \u200b\u200blaminate calculated in square meters. In classical laying of measurement, it is performed exactly the same, but it is necessary to add to the area of \u200b\u200bthe room 10%. The substrate area corresponds to the area of \u200b\u200bthe room. Film should be bought with some reserve. The length of the plinth is calculated on the basis of the perimeter of the room. We fold the magnitudes of the length and width, and then the resulting number multiplied by two.
Instruments
In order for the laminate laying process, it is necessary to prepare tools and auxiliary materials before starting work. We will need:
- plastic or wooden wedges for fixing gaps
- end-mount hook
- wooden 20 cm Bar 40x40 mm
- roulette
- construction corner
- stationery scissors
- pencil
- duct tape
- hammer
- saw for laminate
- drill.
Preparatory work
The first thing to pay attention to is smooth floor. Secondly - he is clean. If the laminate is assumed to put on old wooden floors, they need to be thoroughly washed with a hydroevum. With deviation of over 2 mm, as well as when identifying significant cracks and gaps, wooden floors should be placed and grind to obtain a perfectly smooth surface. Otherwise, they will have to roll up to a concrete basis and align it. Weak wooden floors should be strengthened. If this is not done, then in a short time, the laminate will be emitted and deformed. When an ideally smooth concrete basis is a linoleum, you can safely put a laminate on it, without even using the substrate. Also, but with a substrate, it is possible to lay a laminated coating on ceramic tiles. If we have a not very flat concrete basis, it is important to carefully close all the cracks and pour a concrete mix for the preparation of perfectly smooth and smooth surface. After drying, the floor must be deeply soaked with primer, carefully dry the surface and clean from dust. On the concrete basis, first put the polyethylene film. We do it so that it goes to the surface of the walls about 5 cm. The canvas of the film put on each other.
On top of the film put the substrate. It folds down from stacks to the wall. Cut the substrate must be a stationery knife. Connections are combined with a sticky ribbon. This preparatory work is completed and you can proceed directly to laying the laminate itself.
The process of laying laminate
If laminate laying is planned by a classic way, then the first board must be put in the cornermost area. At the same time, it is necessary to take into account the presence of a mandatory gap of 10-15 mm between the board and the wall using special wedges.
The next board is attached to the end of the previous one. To do this, you need to start it at an angle of 20 degrees in the end lock of the first board, and then omit until it clicks. Laminate boards are attached to each other using special locks made according to the principle of grooves and spikes.
After that, the hammer through the wooden bar need to catch the eck of the board. It will make it possible to connect the castle densely. So lay the whole first row. In the end, measure the desired length and cut off the board, considering the gap. To the last fragment tightly entered the castle, we use the end hook. One of his end should be started at the end of the last board, and the second to catch up with a hammer.
The next row begins with the remaining piece. It also stacked, taking into account the gap of the wall and snaps up with the side castle of the previous row. After the castle snapped, through the bar, you need to catch a side surface of the board with a hammer that the ranks are more closely connected to each other. In this way all rows are stacked. If there are pipes on the way, the holes are neatly cut.
The same should be done at doorways or other protrusions.
If the laminate laying is performed with a diagonal way, you need to start with the angle most remote from the window. Cut the boards will have an angle of 45 degrees. Their remaining part begins a new row.
It is important to pinch three rows to set the direction, retreating from the walls by 10-15 mm. Otherwise, the fragments are necessary for the same principle as in the classical method. At the end of the installation, it remains only to fix the plinth and thresholds. Thus, laminate laying is carried out with their own hands, video can be significantly helped with this.
A little more about laminate
At the end of laying a laminate to the floor, you should not throw out the remnants. They will be useful if you have to repair laminate with your own hands. The coating can be partially damaged when the appeal is inactive with it. In this case, the spoiled fragment is easy to replace to the new one. Interesting designer solution will be door slopes from laminate, with their own hands made. They look very impressive and attached to the room a respectable look. Also, panels on the walls and other design elements can be performed.


