How to install a bath do it yourself Plumbing
The bathroom is the place from which our day begins and ends. Now it is difficult to imagine life without hygiene procedures. The bathroom has in every residential room, whether it is a private house or apartment. Each of us wants to equip this small room so that it is not only functional, but also cozy. How to install the bath yourself? Let's learn more.
Content
If you started repairs in the bathroom and doubt that you are able to install the bath, do not worry, you will always work out. Of course, the process itself cannot be called light, there will be a skill, skill and knowledge. It is important to clearly fulfill all the recommendations to correctly not only install the bowl itself, but also to connect the communications. But before proceeding with the study of the process itself, let's consider the types of baths so that you can decide on the choice of this important attribute.
Choosing a bath. What to pay attention to
As you have a hard task - bath replacement, you need to decide and choose the appropriate option:
- Tin or steel design is an option, though cheap, but install such a bath alone and even with an assistant, will not be easy. This is not the only thing to pay attention to when choosing a bath. The bowl made of metal will last long. If you open a crane and close the plug to dial water, and then release it, then with such manipulations, the metal will "play", and this negatively affects the coating. The only thing that can be recommended is to install the bath from steel into a small bathroom to be covered with three sides by the walls. Only in this case, it is possible to reduce the oscillations of the fine metal and minimize the load.
- Cast iron bath is distinguished by a high degree of strength and wear resistance (of course, if you care for it). Install the cast-iron bath with your own hands is very difficult, as it is very heavy. But this is not the main thing, the fact is that the bath "put" the bath to the old siphon to not damage it, very, very unlikely. The siphon must first attach to the bowl itself and only after that you can install the entire design, which also does not give warranty that the siphon will remain integer. If the bath "stands" on the legs, then it is very difficult to align it in terms of the level, since the metal does not withstand heavy loads. Operation of such a bath can lead to sad consequences - when loading on the product, when we climb inside, the legs are first bent, and then can be broken at all. So it is possible to install a cast-iron bath in a niche so that it is supported by walls from three sides (between 3-walls).
- Acrylic or plastic bath. The life of such a product for more than 15 years. The cost of the acrylic bath is just below the cast-iron. You can install such a bath yourself (with an assistant) without any problems. By the way, if you compare the cast-iron bath with acrylic, then this product is distinguished by the fact that damaged enamel can be restored (in the cast iron it is problematic). And yet, an acrylic bath can only be used for its intended purpose, that is, to take a shower and swim, no chemicals and solutions cannot be poured into the bath (even if it is aqueous solution).
What else should I consider when choosing a bath? Of course, such an important indicator as the weight loss. Remember what our grandmothers still said? The cast iron bath is the most reliable, it retains heat for a long time. Check if it is.
The heat loss of each bath:
- acrylic is the most economical option. The bath is quickly warming up and cools very slowly, because the plastic, from which the bath is made, is very poorly carved. For example, if your home has a water heater and you put water temperature 60 oC, to fill the bath with a comfortable swimming temperature (40 oC), you need only 50 liters of water;
- steel bath. At first glance it seems that if the bath is made of steel, then it should be economical, but it is not. Here is a simple example: the water heater is nearly enough for the adoption of 1 bath, provided that the top of the boiler is set to maximum - 80 oS. In this mode, not every boiler will be able to work. The steel bath heats up quickly and gives its heat into the room. That is, there will be warmth in the room, but the water in the bathroom will cool faster;
- the bath from the cast iron - it warms it for a long time and well gives warmth. This is a plus, but if you calculate everything, it turns out that it will cost to wash in a bath from cast iron in 1.5 more expensive than the "wave" in the bath from steel and 2.5 times higher than in the bathroom from acrylic. The boiler will have to buy 100 liters (it is barely enough for a small family of 2, a maximum of 3 people). There is something to think about.
How to install an acrylic bath with your own hands
Installation of the bath is not easy and very responsible, because the bowl itself is very cumbersome, and if the room is small, it is easy to damage the coating or the bath itself, or spoil the doors or walls. Therefore, alone with such tasks you can not cope, you will need an assistant. This is the first. The second nuance is the need to install plumbing. We will have almost blindly to perform this work, so you need to think it out in advance to think about nothing to imagine anything.
The third moment is accuracy. With the installation of acrylic bowls you need to be extremely attentive and neat - it is impossible to fall a heavy tool in the bath, since it is possible to spoil not only the coating, but also the whole cup.
Preparatory moments are important
So, with the choice of bath we decided, acquired a set for mounting, prepared tools. This is not enough, you first need to prepare the room for installing the bath. Well, if you do not need to be facing the floor and walls with tiles, but just install the bath. But what to do if the repair starts from scratch?
Preparation in order:
- Facing the walls in the place where the installation of the bath is better to postpone on then. Install the bath close to the wall. The wall is still "naked" and without finishing. We enjoy the bathroom close and we make waterproofing (fill in a colorless sealant of the joint between the wall and the bathroom). Now you can be facing the wall with tiles, ranging from the bath. The first tile should be hanging to prevent moisture from entering the bath. Nothing is terrible that such a row tile will stand out, it can even beat and put a row of tiles of another color.
- If you plan only to replace the bath and do not change the tile, then the new design must be put at least 2 cm higher than the old bath stood (the legs can be checked on 4/5 or 3/4). Why do you need it? The fact is that an ugly plot is formed on the site of the old bath (the tile in this place will be different in color), so you need to slightly raise the legs of the bath to close it.
If everything is clear with the walls, now you need to deal with the floor. To install the bath, the floor must be even, as well as durable. Especially this concerns the bowl of the cast iron. You must be sure that the floor tile is laid on a solid and durable cement. If there are emptiness, the tile under heavy weight bath will split. What if you are not confident in the strength of the floor? Then you can put on the floor of the board (choose boards from larch) and lay them so that the legs stand on the boards. Tree (juice board) you need to pre-process the oil. By the way, laying boards will help solve the height of the bath.
To make waterproofing the installed bath, it is important not to rush - you need to fill the bowl of water and leave for 7 days (at least 2 days) to distribute uniformly load on the floor.
What should be the height of the bath?
If you are looking for answers to the question of how to install the usual and angular bath with your own hands, then it is necessary to take into account the height of the bath itself. This is very important not only for the convenience of lining the plumbing, but also for facing the walls. If you raise the bath higher, you can put a siphon with an in-depth knee. This will allow dirty water not to stir and improve the outflow of water from the bath. If you raise a bowl of 5 cm, then you can get rid of accumulation in the siphon of garbage and hair. If you have ever come across the cleaning of the siphon, then you will understand how unpleasant work is.
What to buy drain fittings
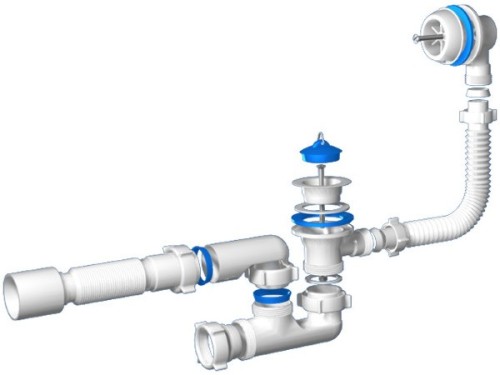
Plum reinforcement is made of plastic, it is PVC and polyisopropylene. The second material is stronger than PVC, the material is resistant to an aggressive environment and over time it does not lose its properties. The material is easy to distinguish the power, the first will be a little rough, and the second is smooth. This is very important during operation, since the propylene hose can skip a large flow of water. Such hoses are less subject to clogging than drainage fittings made of PVC.
What else needs to buy:
- Drain is preferably choosing without a bolt. Since it can quickly rust on a plum and promotion it will not work. If you need to remove the drain, you will have to break it to put a new one. Bolt from another material (brass or bronze) will not solve the problem, as it will also oxidize with time.
- Drain mesh. It is undesirable to buy a cruciform mesh, she quickly "catches" hair, but to get them from there it is very difficult. A good option is a mesh with round holes, and even better - a grid with oblique profiled holes. Then in the bath you can still wash the carpet tracks without fears that the stock will be born.
- Publive pipe - it is better to stay on a flexible hose with a wide lumen.
- The selection of the plug is also important. If you buy a plug with a chain, then it quickly degrees and breaks. The best option is to put a color durable fishing line instead of a chain so that it is clearly visible in water.
How to install the bath on the legs do it yourself
To install the bath you will need a special tool, we recommend it all to prepare in advance so that there are no misunderstandings:
- prepare a rigid bar (length of the bar is equal to the length of the bath diagonally). It will be our level;
- key for tightening fasteners. The adjustable key will not fit, you need a fork. Passatia is also not the best option, as you can damage fasteners and a bath;
- rubber small hammer to perform a shrinkage of the legs of the bath during the assembly. Obtaining such a hammer will allow preventing the formation of cracks into enamel when installing the bath.
It is still necessary to prepare a silicone colorless sealant, a soft tissue isolate, a clean rag and a hairdryer.
Regardless of which bath you need to install (acrylic, cast-iron or metal), it is necessary to align the bowl relative to the level of sewage. You need to remember that any bath should be lifted if the angle is omitted, but in no case to omit the raised angle. We have already mentioned that the higher the bath (on legs or bricks) will be installed, the drain will be cleaner. It is very important that the pairing with the sewer plum is made after aligning the bath level. Therefore, the cuff must be taken from soft material to install the pipe for the drain at any angle of inclination. By the way, instead of the finished cuff can be adapted to fit or soft rubber (rubber, raw rubber). Externally, this is a white soft plastic mass, such a connection is considered reliable and will last up to 100 years. By the way, I used crude tires in Soviet times, it was called "military sealant".
If this option is not for you, we advise you to buy the reinforcement of the drain hole with a wide nozzle so that the resulting space can be filled with silicone sealant.
Remember that it is prohibited to use construction foam! It increases greatly in the amount when it works, and can close all the space. You have to buy new materials and do everything again.
How to establish a conventional and angular acrylic bath with your own hands:
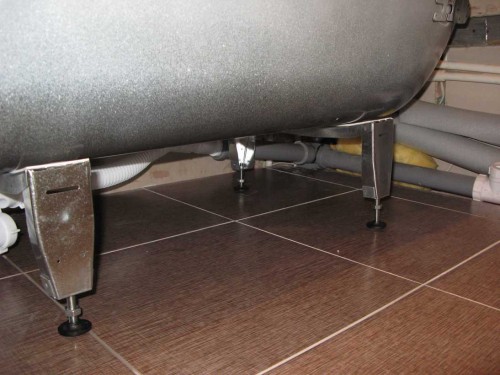
- Align the bowl diagonally. First need to put right andlo on the diagonal of the bowl to align horizontally. Simultaneously tune the bolts leg bolts.
- We transfer the bar to another edge and repeat the actions. We check that the first diagonal does not come down (when the floor is even, then this will not happen).
- Now it is necessary to level the level of bathing of the bath - for this we simply put the bar to the edge of the bath and adjust the legs on each side. Go to the opposite direction and repeat the actions.
- It is important that the bath is horizontally, there is no need to tilt, as it is provided in the design of the bowl itself.
- Now you need to prepare all the details to connect the bath to sewage. All items must be clean and dry. Do not be lazy to wipe them with a dry clean cloth, especially from the inside.
- And it is still very important: when assembling the nozzle and connecting to sewage, make sure that it is not flowing from the kitchen or from the sink. If you are going to install the sink in the bathroom with your own hands, then you need to clean the pipe and the pipe itself at least 50 cm on each side, and then wipe with dry wind. If you find inside the flare, it can be left, but it will have to dry the walls. After impregnation of the pipes with a rag, use the hairdryer.
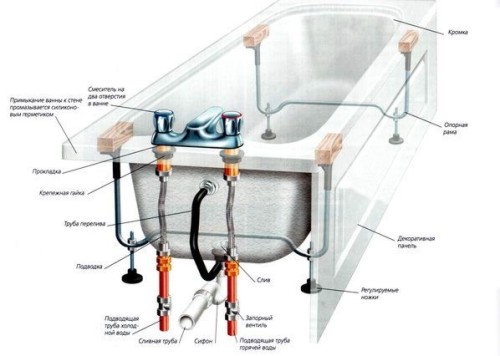
For clarity and understanding of the workflow, we suggest familiarizing yourself with the bath installation scheme:
How to install a steel bath with your own hands
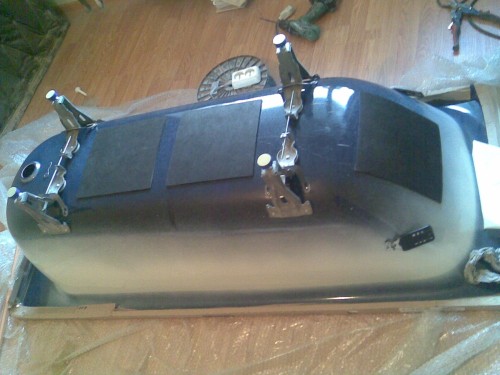
Installation of the bath - the task is not easy, you first need to collect the entire design - to attach the guides for the support, install the frame for an acrylic bath. It is very important to make a correct marking for the self-tapping screw. If nothing is said in the instructions, then the front position must be put on 17 cm, the second is the location of the bowl transition to the rear. Points need to be marked with a pencil and drill holes. The bath must be put on the side to attach the reinforcement for the drain. Here there are features: you need to smear each silicone laying and install a drain gasket outside. Conical gasket (between the drain hose and overflow) insert the sharp face to the cropped hose so that it is inserted into the retrailer during tightening. Thread is not worth tightening.
Now the bath can be put upside down to fasten the legs, after which it can be turned out and put it in the bathroom to put immediately in place and tightly move to the wall. When you put a bath, make sure that the water release hole coincides with the sewage pipe. If not - the bowl needs to be aligned and only after that it is good to seal the joints. Little trick: While the sealant has not yet managed to finally grab, try to tighten the joint key. One person must sit in the bath and hold the details, the second to twist all the connection points. After the sealant finds it, it is necessary to check all the joints so that the water does not succe. If you have discovered the inflores and sealants, you can remove them with a cloth moistened in vinegar. Colorless sealant You need to fill all the slots between the wall and the sides of the bath.
By the way, to fix the legs of the bath, you need to insert them into the fasteners and tighten with nuts (you can bolts or wedges). Remember that the sticking of the legs should be durable. To get rid of the noise of water when typing into the bath, you can put the pieces of rubber (cut out of the car chamber).
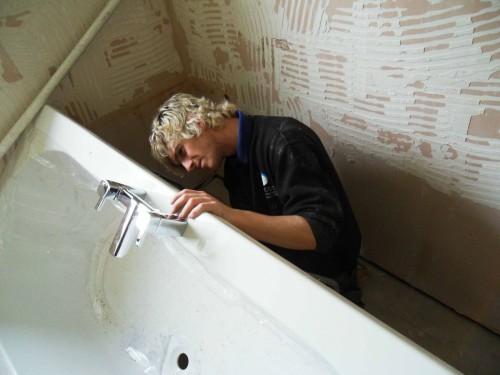
Only after the bath is installed and connected to the sewage, you can set the mixer in the bathroom with your own hands.
How to install a bath with your hands video:


