
Roof liner do it yourself Construction
The roof liner is performed after the completion of the main installation work. It is necessary to ensure the natural ventilation of roofing materials, as well as for aesthetic sole design. In this article, it will be described about how the cover of the roof cornice is made with their own hands.
Content
About the types of cornisses
Distinguish two main types of sinks:
- eaves (side);
- fronton.
Read more about each of them.
- Outflows are formed by parts of the rafter feet, protruding for the outer walls of the building. It should be sufficient to ensure the diversion of rain and melt water from the walls and the scene (usually about 0.6 m). When calculating the length of the cornese sink, you need to take into account the height of the building.
- Frontal Sve is designed to protect the front and facade. In the design of the bartal roofs of the svet of this type, it is formed due to the protruding edges of the crossbar, laid across the rafter legs. The crossbars are combined with a cornice board and in the end are trimmed with decorative material.
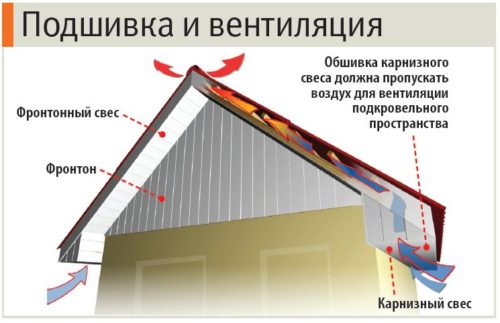
IMPORTANT: The sheathing of side cornissets should ensure the ventilation of the space between the roofing material and vapor barrier. Frontal soles are trimmed tight, without ventilation gaps.
Roof sinks with their own hands: choose the material
For the design of cornice and frontal soles use various materials. The choice depends on the personal preferences and the overall concept of the exterior of the building. It is important that the material is durable and durable. Designers offer the following options.
- Registration of professional flooring. This material is a profiled steel sheet coated with a protective layer of zinc and a polymer spraying. The color range of profiled sheets is varied, which allows you to choose the desired shade, which is harmonized with the walls of the walls.
- The use of soffits from PVC. The appearance of this material resembles vinyl siding, but with small oblong screws for ventilation.
- Sofa from sheet copper: differ (except for high cost) long service life and aesthetic appeal.
- Sofa from galvanized steel: not inferior to copper strength and duration of service. The disadvantage is a significant weight requiring the use of reliable fastening elements.
- Sofa from aluminum. Durable and lungs, can be painted in white or brown. The limitations of the color palette narrows the scope of their application.
- Lining: For sofits, good dried wood with a thickness of at least 20 mm is suitable. After mounting, sofa from wooden lining is processed by antiseptic means and cover the protective paint. Ventilation is provided by a clearance of 15-20 mm, which is left near the wall.
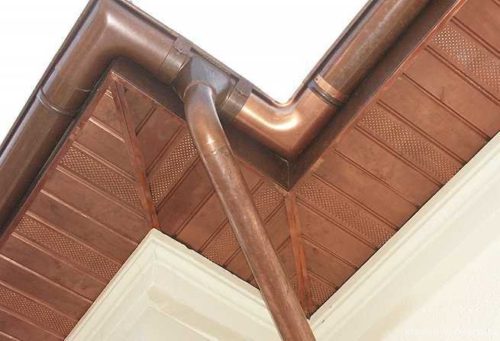
Copper Sofits: Expensive Material with a Large Service
Switching roof with do it yourself: process technology
The binder of the cornice is performed directly along the rafter feet or on the box of metal profiles or a knocked out of wooden bars (RECES).
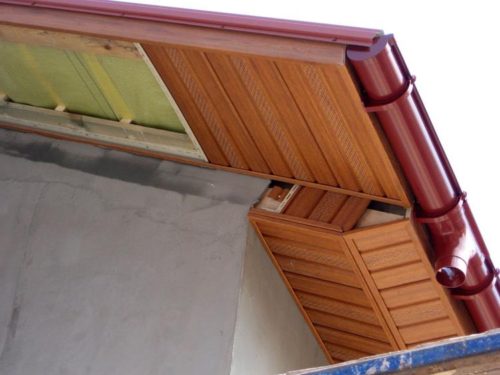
Svet fusion
- Svez on rafting legs are arranged for roofs with a small angle of slope. The ends of the rafter should be in one horizontal plane. In order to smoothly fasten the extension material, between the extreme rafters in two places stretch the cord.
- The decoration of the sink of the box is used for the roof with a large angle of slope. With the help of metal or wooden rail profiles, the box is built between extreme (lower) dots rafters and a wall of the house. On top of the box, the cover of the roof of the sofa with their own hands.
Tip: Fasten the parts of the wooden box should be self-drawing, as nails do not provide the necessary reliability of the connection.
Roof liner with your own soffits
Work can be divided into several stages.
- At the level of the lower edge of the sink to the wall fasten the horizontal rail. A J-shaped starting profile of plastic is screwed to the rail.
- At the bottom of the rafter feet fasten the plastic profile in the form of an inverted letter "F". Its position should also be strictly horizontal, it must be in the same plane with a P-shaped profile.
- The distance between profiles is measured. From the result obtained, 5-6 mm are taken: Sofit should be divided into such segments. The clearance is necessary to compensate for temperature expansion.
- Finished segments are slightly flex and inserted between profiles. Fix sofit elements with self-draws.
During installation, the following rules are followed.
- Works are not performed if the air temperature is below 15 ° C, in order to avoid damage to the plastic (it becomes fragile in such conditions).
- Sofites should be perpendicular to the external walls.
- To ensure ventilation, be sure to leave 10-15 mm.
- Cutting material for sofites is recommended by a tool equipped with a filling with small teeth. Cutting copper, aluminum and sophytes made of professional flooring are performed by metal scissors.
- The cover of the roof with their own hands (see the photo below) is performed by self-strains of at least 30 mm long. The distance between the attachment points is 0.4-0.5 m.
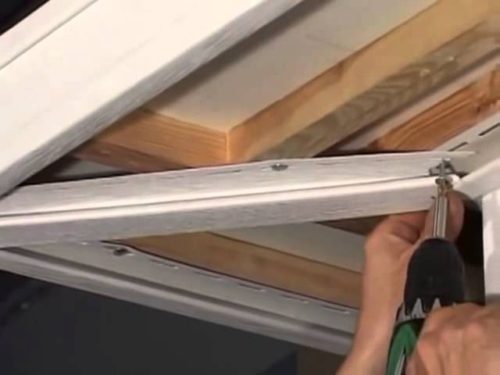
To binder sofit and fastening the connecting elements, screws 30 mm long and more
The cover of the roof eaves with their own hands: video, clearly demonstrating how the roof looks like after final finishes.
To note: the roof firm siding with their own hands is performed similarly. It is important to consider the lack of ventilation holes. You can compensate for this disadvantage using a gap of 10-15 mm, left between the staped material and the wall.
Roof firmware with your own handstock
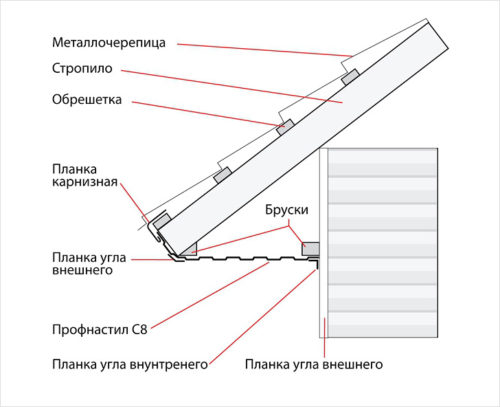
Technology provides the following actions.
- The wall at the level of the lower edge of the cornese swell is mounted bar. The same bar is attached to the rafters.
- The gap between the mounting bar and the roofing material is closed with a frontal board.
- The professional flooring is cut into strips, the width of which is calculated depending on the width of the cornese swell, taking into account the ventilation gap of 0.6-1.2 cm.
- Professional flooring is attached to the assembly brushes.
- The outer angle and the adjoining of the wall decorates appropriate in the form of elements.
Roof swings with do it yourself: video with specialist comments about some installation nuances.
Ferrous Svet Cover
The plastic or wooden lining can be used to finish the cornese soles. The latter should be processed by an antiseptic agent and protected from moisture of paint outdoor use.
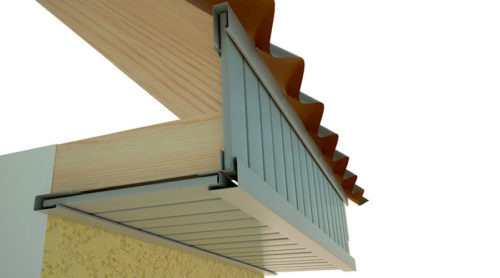
For mounting plastic lining, installation of a framework and installation of J-shaped profiles as described above is necessary. Wooden attached self-drawing directly to the bars. In both cases, the ventilation clearance must be left or installed special lattices every 1-1.5 m.
FRONTONONOV FRONTONTOES DIY
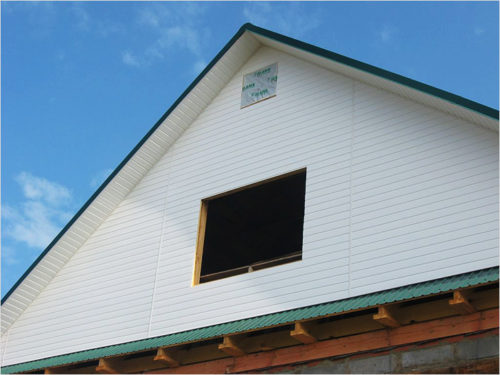
Siding, lining, profiled sheet can be used for finishing. Regardless of the finishing materials used, roofing works at this stage have some features.
- For installation requires installation of the forest system.
- Fronton switches are performed directly by the protruding parts of the horizontal crate. If necessary, additional elements from bars or rails are fixed.
- The gaps between the stitched material and the frontton do not leave: the roof ventilation is carried out through the cornese skes.
- Over the trim and roofing material fasten the wind (end) bar as shown in the figure below.
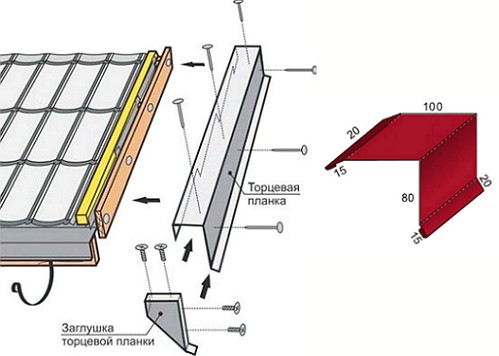
At the end - the roof lifting with your own hands: the video where the installation errors are indicated.


