
Installing entrance doors with your own hands Doors

The article describes the step-by-step instructions for self-installing input metal door. If the door is installed by representatives of the seller, then this information will help determine the correct installation.
Introduction
Before the start of work, it should be clarified by the seller's company, whether the installation of metal doors will not affect its forces on warranty obligations. If, as a result, it was decided to install the door independently, then the work is built so that it is over the day it is over, especially in an apartment building. If there are neighbors, then it is undesirable to make noise after 23.00, but staying at night in an uncomplicated apartment - unpleasant. How to do it?
Install the entrance door in one day
All sizes are removed before the purchase, the width is selected for 4-5 cm already selected, so that on each side after installation in the opening, the indentation from the overall block to the wall was 2-2.5 cm. It must be thought of where the door should be opened. In the apartments, the same location of the loop, which was, is often selected.
The technology of installing the entrance doors is a waste procedure that is convenient to divide into steps.
1. Removed with the loop old door. It is easier to do it together using mounts, to pose a door leaf from below. Next, old platbands and frame are removed by the mount. Then the entire construction trash is removed in the opening.

2. The size of the input doors is standard. They are manufactured taking into account guests and SNIPs, so the door is usually picking easily for the apartment. For a private house, which was once built, on its own - may not be a suitable door. In this case, the opening will have to or narrow, or expand, or even change its height.

It is narrowed by the usual cement mortar: 1 part of cement and 2 parts of the sand. Suitable brands M400 or M500.
Expanded opening with a perforator or a grinder.
The wall around the door frame must be equipped firmly. The attackers can try to open the door, not only unscrewing the locks, but also breaking the hole in the wall so as to reach the castle from the inside. It is better if the discharge is not required, because the solution dries a long time, and the steel door can be heavy. If you still have to narrow, then the anchors are screwed down much deeper.
3. Frame is placed in the prepared opening. Initially, it is fixed by several wooden wedges on the inside. Each corner with an external and inner side is checked with a plumb, not always the walls and floors are smooth. To determine the horizontal position, a bubble level is used.
Monitoring with a plumbing and level should be made at all stages, until full fixation of the frame in the opening.

When the desired position is found, the door frame is fixed with metal pins or anchors, to a depth of 20 cm. Fixation begins with a hinged side: immediately above, then below. After that, from the lock side: from above, bottom and in the middle. The rules for installing the entrance doors vary depending on the material and width of the wall in the opening. The pins are used for walls of brick and reinforced concrete, for porous walls: only anchors are suitable for gas and foam concrete. In any case, it is better to use anchors and they often come in the kit, when screwing into the base, the anchors are expanding and securely fixed.

All mounts are located so as to go deep into the walls.
4. After installing on anchors or rods, additional fixation is made with wooden wedges around the perimeter. Then the anchors / rods are welded.
In some models, anchors after screwing are simply closed with plastic lids. In this case, before screwing them down, it is better to drive a little into the wall, then over time they are not loosened and not discharged back.
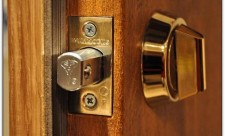
5. Pens are installed. When buying in the store, they come in a set and under them there are holes in the door canvase.
6. Next hits the door canvas. It is easier to make together. Loops are lubricated if necessary. They put on simultaneously, it is impossible to hide the canvas in any way.
Test for installing installation: switching the door to an angle of 45 ° and leave in this position for 10-15 seconds, the same to do for an angle of 90 °. If the door did not close or open itself, then the input door was made correctly, the design does not have distortions.
Now you need to open the door several times and close the door, check the locks so that there are no jams. If there are hots, then the attachments of the bolts are tightened by the cross screwdriver.

7. When the door is already in working condition, the mounting area is fatched, especially carefully between the wedges.

Nonprofessional installations of the iron entrance door takes longer. At this stage, day work can be completed and continue them the next day.
8. The surplus of the mounting foam after drying is neatly cut into the floss with the door frame. It is installed in the eye, more often it is just complete to make a hole at a convenient height of the host growth.
9. At the last stage, the installation of platbands at the front door.
Recommendations
The protective film from the canvas is better to shoot at the very end of the installation. A few days after installing the door, handle it should be taken carefully: not to clap, do not jump on the threshold so that the solution is fully hardened.
The armored door is designed for service life for more than 10 years, with the proper installation of the safety of residents and property for all this time is guaranteed.
For clarity, we suggest watch a video:
Calculators


Correct tool sharpening. How to sharpen the tool with your own hands 29.01.2017
In the process of operation, the cutting edges of the instruments are stupid, which leads to a decrease in the quality of processing parts and blanks, to a decrease in labor productivity, as well as to the wear of the tools themselves. Right ...


Themed photos