How to mount the lining Building materials
Interior decoration is the most cost part of the construction. But at this stage you can also save: inviting masters optionally. However, much depends on the quality of the interior decoration, and therefore, before proceeding to work, the process technology should be studied. In this article, it will be told how to mount the lining. After reading the information, you can see the balcony, a veranda or sauna on the household plot.
Content
Types of lining and its advantages
There are lining depending on the material from which they are made:
- wooden (most often from pine, linden, maple, less often - from birch and oak) - Environmentally friendly material that is required to protect against moisture with special means;
- plastic (manufactured from polyvinyl chloride) - does not support combustion, not afraid of dampness, there is no habitat of microorganisms;
- MDF (represents a compressed cardboard, an estimated decorative PVC film, imitating the surface of various natural materials).
Any of the specified types of lining is attached in a similar way. The advantage of this finishing material is the ability to quickly align any surface. It should be aware of its advantages:
- easy installation, appearance attractiveness and relatively low cost of material;
- universality of application: not only walls can be trimmed, but also the ceilings;
- long service life with proper care.
Some recommendations on the installation of lining
The general rules should be followed during the interior trim.
- To reduce the installation time and expenditures on building materials, the lining should be attached not to the wall, but on the frame from the rectangular bar.
- The framework elements must be attached perpendicularly with the lining: if the latter is installed vertically - the timber is mounted in a horizontal direction, and vice versa.
- For a relatively smooth base, a bars with a thickness of 10-15 mm are used. They are attached to the wall with self-draws or nails. For walls with significant surface defects, thicker bars or rails are selected.
- Wooden frame must be treated with antiseptic drugs.
How to mount a wooden lining: installation technology
Phased the process of plating the wall with wooden lining can be written as follows.
- Depending on the selected direction of installation of panels, the frame elements are fixed to the wall. For this, first determine the curvature of the walls and find the most protruding part. In this place, the first timber is installed, and the rest are fixed on one level with it, lining pieces of plywood if necessary.
- In order for the bars to occupy the correct position, the threads forming the wall plane are stretched. They establish the remaining elements of the crate. The verticality of them is checked by Waterpas or a plumb. From how the lamp will be installed, the quality of the molding is depeted.
- Between the bars located on the same line, it is necessary to leave the gap to 50 mm (in case of the expansion of wood with an increase in air humidity).
- The distance vertically (or horizontal) between the bars should be within 450-500 mm. Brussia must defend from the wall for a certain distance for ventilation.
- The bottom of the wall should be treated with waterproofing material (for example, liquid glass) so that it does not absorb flowing condensate.
- In the field of window and door openings, the bars of crates are attached in such a way that the slope can be sewn. That is, the elements of the crates must go beyond the lines of openings.
- The bars of the frame are attached to the wall using braziers or screws that are installed in advance. This makes it possible to reduce the number of holes in the wall.
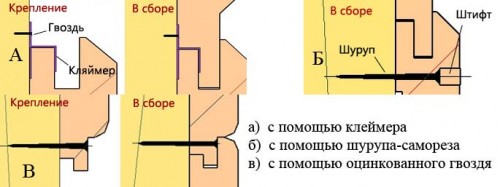
- Before mounting the lining with nails, kleimers are installed on the side of the groove.
- Without them, feeding is performed on the side of the spike, and the nail is placed at an angle to the surface. Then the next panel will close the mounting site. Nails are better to use furniture: they have small hats. It is preferable to use galvanized: they are not oxidized and do not form rusty drills.
- Nails are clogged with a small hammer or using the extension to accidentally do not hit the front of the panel.
- Installing panels is carried out from one corner in both directions. After the first board is installed, it is nailed along the edge of the ridge. Before mounting the clay meters, it is necessary to make sure that they correspond to her mind. There is a division of these fasteners by numbers.
- The lining should not be restarted in the floor and the ceiling: it is necessary to leave compensation gaps of 20 mm. They will subsequently close by plinths.
- The next board is inserted by the crest in the groove and bubbles. After that, its fixation is also performed. The remaining panels are attached in the same way.
- Cut the wooden lining with an electrolybiz or manual hacksaw.
Fastening the lining to the metallic profile
In some cases, the frame for fastening the wallboard is mounted from metal profiles. In this case, you have to use the screws. What kind of self-drawing is molding? It is recommended to choose thread for screwing into the metal. Their length should be more on a third of the thickness of the lining. When installing, it is necessary to take into account the following nuances.
- In place of screwing the self-drawing in the wood drill a well for a hat.
- The drill is selected with a diameter equal to the diameter of the hat.
- Saws screwed up with the help of a screwdriver.
- The hat in the hole is shaking selected in color with a special mastic.
How to fix plastic lining
To properly perform work, it is necessary to consider the following.
- To attach the first panel, the starting strip is used. It is fixed by a construction stapler. The lining panel with a grain edge is inserted into the starting strip, and on the side of the groove it is fastened to brushes with brackets.
- Seamless panels (especially glossy) should be tightly customized to each other. Otherwise, the docking line will be noticeable.
- The bracket should not interfere with the spike of the next panel to enter the groove of the previous one.
- It is allowed to mount the plastic lining with nails: they are located as close as possible to the corner.
- To the smooth and smooth surface of the panel can be attached with liquid nails.
- If necessary, plastic panels are easily cut with a shallow teeth or a sharp construction knife.
- For mounting corner connections, a special profile is used: an external angle, internal or universal.
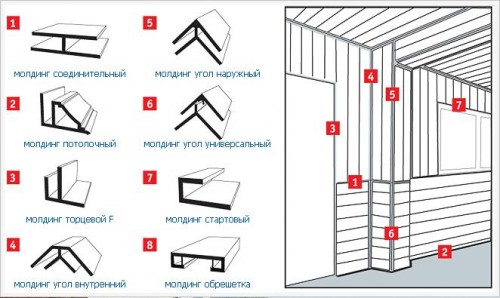
- To cover the wall with short panels (for example, a single color) use the connecting profile (molding). There are also other moldings: the end F-shaped, ceiling, for mounting the crate.
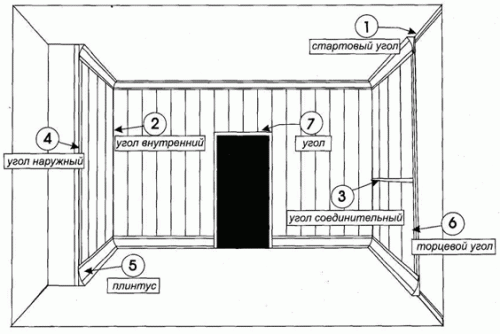
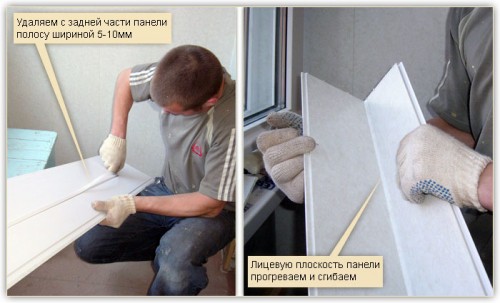
- In some cases, it is possible to do without angular moldings: plastic lining can be bent if cut from the back of a strip of about 10 mm wide, and the facial gently warm up the construction hairdryer. Caution should be done: PVC panel can change the form when overheating.
On how to mount the lining: photo for clarity:
How to mount the lining to the ceiling
In order to rinse the ceiling of any kind with the clapboard, the following rules must be followed.
- For mounting frames, 20 × 25 mm sizes are used.
- Long bars (3 m or more) is attached at least 5 points. All bars are attached strictly horizontally.
- In order for the bars of the frame to be strengthened exactly, the bars reinforced along the edges pull two cords for orientation.
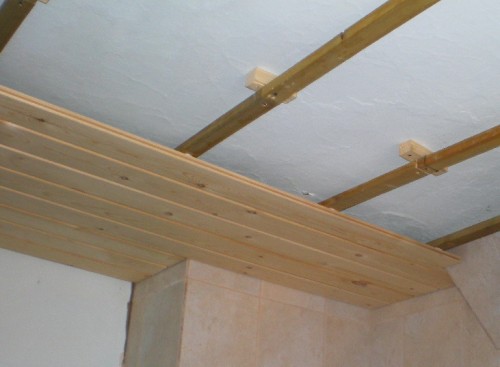
- Wood needs to be treated with an antiseptic and hydrophobic agent.
- Wooden lining attached to the bars finish nails.
- Plastic panels are shot by a construction stapler.
- In space under the wagon, there are ventilation channels, wiring and other communications.
At the end, we suggest familiarize yourself with how to mount the lining (video) to the ceiling.


