How to build a shower in the country do it yourself Construction
Regardless of how often you are planning to spend time in the country area, it will certainly be necessary to arrange an elementary amenities that are one of which are a shower. The type of future design directly depends on exactly how you plan to spend time in the country. Passive long stay with comfort from the city and the panders will make sure to establish a stationary shower. With the arrangement of the land plot under the garden, the garden, the flowerbed with a brief stay is quite possible to do with a simple design.
Content
Compact portable shower
The simplest and most accessible option that you can use in an infrequent visit to your site without performing dusty works - a portable shower for giving. It is made in the form of a compact black bag that is filled with necessity. Standard volume is 20 liters, which is enough for once. Continuous water leakage continues on average 10 minutes.

Package of portable soul
- water tank
- tube handle for easy carrying filled bag
- rope for hanging
- jet divider.
Mode of application
For use, fill the tank and put in the sun. After the water in it reaches the desired temperature, hang up to a height of about two meters at any convenient location and unscrew the crane.
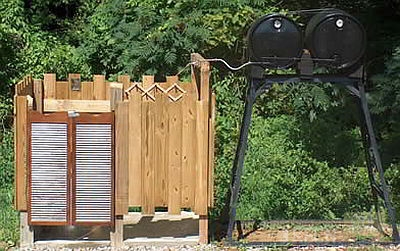
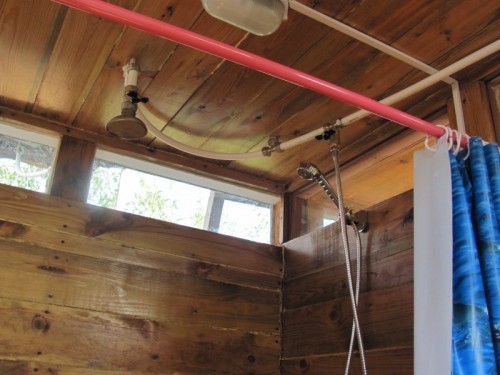
Outdoor shower
Outdoor shower of simple design will also require you for insignificant costs and money and time. Such homemade souls in the country can serve for several years.

Montaja technology
Follow these steps:
- Choose a place with maximum sunlight access.
- Attach the branch of the plumbing pipe to the wall.
- Using the hose, connect it with a watering divider.
- Screw the hardware mount on an altitude of 2-2.5 m.
- Attach hooks and panel to locate detergents.
- Install the screen or insert the arcuate tube with rings for curtains into the wall.
For more convenient use, in the future, you can equip the floor of the soul, the extracts of it, for example, a porcelain stoneware or any other artificial stone to warn slip.
Byetovka
One of the very convenient options is the household with a shower for giving. Such a building is fairly in demand for the arrangement of the site.
Types of households for giving
By the method of arrangement of an internal space suitable for use in such conditions, two options can be noted:
- housing with hozblock
- separate building sanitary and hygienic purposes.
Design features
Construction of cabins - modular block container or frame-collapsible blocks. The dimensions and design of the indoor space may vary depending on the proposed operating conditions. When ordering the manufacturer, check the details of the planning and offer your wishes.

Sequence of installation of installation
- Follow the territory of the estimated installation.
- Remove 10-15 cm of soil.
- Create a pillow, falling asleep to the ground level of sand with gravel.
- Cross.
- If necessary, put the plafhmy board on top.
- Install the finished design or make an assembly from the configuration elements directly on the spot with a clear consequence of the circuit and the assembly instructions.


Selection of material
The framework of the frame and the casing material is chosen on the basis of personal preferences and indicators of strength. Standard options for frame - wood and metal. Wooden and PVC lining are used for cladding.
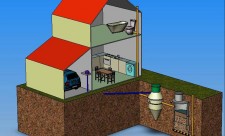
How to make a shower at the cottage?
Let us then consider the option of a more strong stationary design, the use of which will be as comfortable as possible.
Planning
The main nuances with which it is worth determining initially
- Formation of Stok.
- Water supply method in reservoir
- Water heating method

Pursuing the goal to build a sanitary unit alone, consider pre-ready-made shower projects for giving. Even if you do not stop your choice in one option, you can more clearly imagine the desired layout of your future design.
Criteria for selecting location
- Location of water supply. Take into account when choosing the need to lay the connecting pipe for uninterrupted water supply.
- Elevation. A small angle of slope is necessary for the rapid outflow of the used water.
- Distance from home. Not necessarily backdrop, but preferably a close location for a short transition.
- Abovelessness. Despite the integrity of the future design, make a choice of installation location in favor of the absence of through stream of air).

Dimensions
What to pay attention to the design of the shower parameters?
Taking into account that a pursued goal is a comfortable preparation of water procedures, for the design of parameters, go rationally. The soul device in the country should not represent a narrow box with a barrel at the top. Consider your dimensions, as well as all those who will wash regularly, so that there is an opportunity inside not only stand, but also freely turn around.
Standard dimensions used in the construction of the summer soul
More appropriate parameters for this type of structures - 190x140 cm. At the same time, 100x100 cm is the size of the shower cabin itself, and the 60x40 is a place allotted under the changing room. The height of the building varies in the range of 2-3 meters.
Installation markup
Marking the place of installation in the process of building a soul in the country, taking into account the thickness of the material used. For example, if the dimensions are in accordance with the 190x140 layout, and the main building element is the board (most often used 10 cm width), then measure the 200x150 rectangle on the soil.
Installation of foundation
What is the foundation to establish when building a shower in the country?
The thickness of the foundation will depend on the selected material. If the soil is buming - fill the 40-centimeter monolithic foundation on the sandy pillow. Preferred technology for other soil species, given the height of the design - pile.


Safety Technology Patch Foundation
- Try the holes in the soil in a depth of 1-1,5m or vaby piles into the soil without preliminary preparation.
- Set the tubes from asbestoscertic or metal with a diameter of 90-100 mm so that 20-30 cm performed above the ground level.
- Make a deepening for a plum pipe at an angle.
- Insert the flow tube before the final fill of the base.
- Prepare a concrete mix in accordance with the instructions.
- Fill with concrete piles.
- Slide the surface.
- Wait for drying.
- An isolate the surface from the effects of the stock water with the help of a PVC film and a rubber clamp or a 2-x xlay ruler.
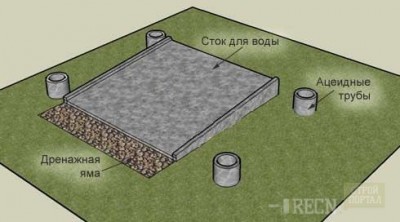
Slum arrangement
Install the drain system in accordance with the technology selected in the design process. To connect to a common sewer network - launch the corresponding connecting pipeline. If nearby there is no waste ditch or a common sewer system - throw a hole near the future design of the shower. The dimensions of its correlate with the size of the tank and the estimated frequency of use to avoid overflow. For example: the average volume of the drain pit is 2 m3.
Do not forget about the ventilation of the drain, it will save from unpleasant odors of stagnant water and rot during operation.

Montage Karcasa
The next stage of construction of the soul in the country is your own hands - setting the framework of the structure. For this process, wooden or metal beams are suitable. Follow these steps:
- Wake the beams in the ground in the corners.
- Bewness.
- Wait until the concrete freezes.
- Perform the top and bottom strapping.
- The foundations of the walls are built with rigid hitch (not in the lining!).
- Perform an internal dressing that will become lags for the floor.


Floor arrangement
When making a floor, take into account the need for a high degree of hygienic cleanliness of the surface, ease of care, as well as the degree of slip during wetting.
Procedure
- Form a low threshold between the locker room and the washing compartment to eliminate the flow of water.
- Subscribe the floor in one way:
- mock the boardwall, withstanding the gaps between the bars
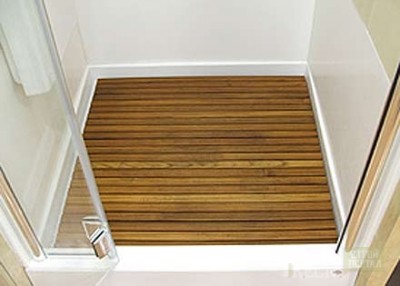
- install a special soul tray at the cottage.
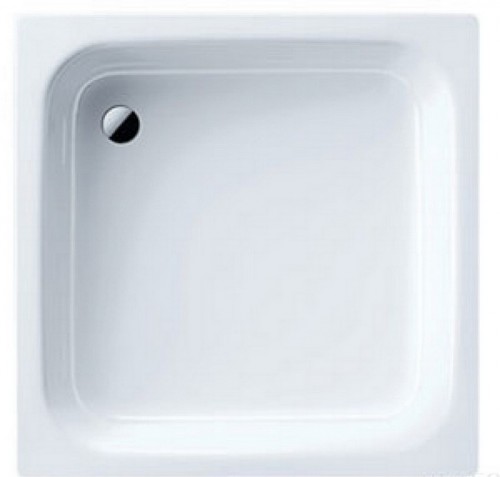


Note that the presence of cracks during finishing boards contributes to free air penetration, which can form draft. When installing a pallet, the outflow of water occurs through a special drain hole and the hose allotted from it, which eliminates the accumulation of moisture on the surface after operation.
Installation of water supply
Designing the water supply for water supply You have completed in the process of preparatory work planning. Now install all the elements of the chain in accordance with the scheme. To properly perform a number of works of this area, consider the following nuances:
- As a tank, use a metal barrel or a black plastic tank, volume from 100 to 200 liters (the calculation is performed, based on 40l per person).
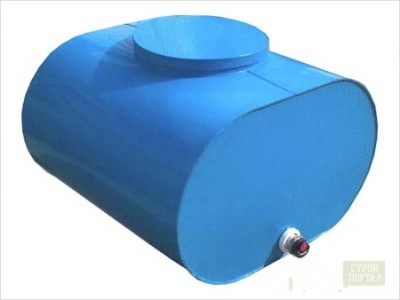
- Mount to it the water level meter or the valve that overlaps the flow of the fluid during tank fullness.
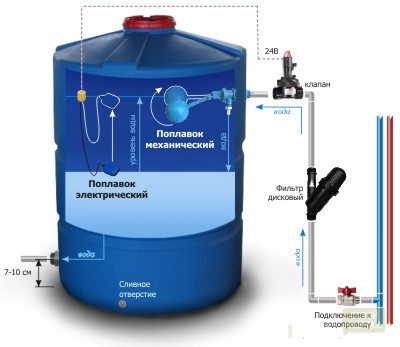
- Conclusion under the hose of the watering divider, we design above the head level to prevent low-pressure drops during operation.
- Create a greenhouse for the reservoir, the basis of which will be the frame from BRUSEV, covered with PVC film.
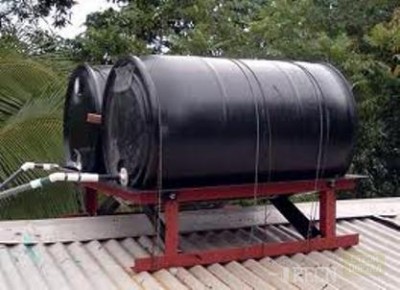
- Purley the foil reservoir, it will contribute to the acceleration of water heating from sunlight.
- Install the reservoir upstream shower design.
- We weld the water pipe or screw the pump hose through which water is supplied.
- If necessary, build next to the shower or electrical heater (do not forget in this case about safety equipment).
- Drill in the ceiling hole for the deposition of condensate and close them with a grid.


Warming design
Why do you need insulation and what material to choose?
If you wish, you can create an additional thermal insulation layer so that I certainly did not become a barrier for swimming the weather (which is not surprising for our climate). A polystyrene can be applied as an insulant material, foam or choose at its discretion (the range of similar products on the market is wide). 
Sequencing
- Fill the framework space insulation.
- Cut the polyethylene film.
- Secure the braces with a stapler. Lower bar Wrap a film and attach in that position. This will create the protection of the inner material of the wall from moisture and will set the direction of flowing water in stock.
- At the door, install overhead seals to exclude purge.
Facing
Decorative exterior surface cladding can be performed by any material. Most often for this purpose, a similar main building is used to create a correspondence of the style direction on the site and build a summer shower at the cottage without excessive expenditures.
When choosing a material, take into account the ease of installation, strength and resistance to moisture. Among the most common materials used for the construction of a shower cabin, select the following:
- OSB boards
- wooden bars
- plastic panels
- sheets.

Internal surfaces cover moisture-resistant material. For example, the PVC lining is perfect in this case.
It is not recommended to use painted wood for the inner surface, and the installation without a protective layer will lead to a very short term of operation due to rotation under the influence of moisture.
Video
Browse the technology to the video applied below.
Calculators


Correct tool sharpening. How to sharpen the tool with your own hands 29.01.2017
In the process of operation, the cutting edges of the instruments are stupid, which leads to a decrease in the quality of processing parts and blanks, to a decrease in labor productivity, as well as to the wear of the tools themselves. Right ...
Themed photos