

The floor of concrete in the garage do it yourself: grinding and polishing concrete floor Floors
The construction of any building is impossible without the flooring device. The same applies to garages. Requirements for floors in the garage, where the car is stored and serviced, is a bit tougher than for floors in the residential premises. Here the coating is constantly experiencing mechanical loads (vehicle weight), the impact of automotive chemistry, oils, exhaust gases and moisture, when the vehicle is placed after a trip to the rain or snow. All of these factors affect the reliability of the floor, so the coating should be arranged with a margin of strength.
Content
- The floor is made of concrete in the garage. Why concrete?
- Device floor from concrete on the ground with their own hands
- Preparation of soil to floor flooring from concrete in the garage
- Floor flooring work from concrete
- Pouring a rough floor of concrete with your own hands
- Applying a protective layer on the floor in the garage
- Filling the floor in the garage concrete with her own hands: photo
- Fill the floor concrete with her own hands: video
If under the garage there is a source of groundwater close to the surface, the coating should reliably protect the construction from the penetration of moisture inside. Otherwise, the repair of the car body after corrosion will cost much more expensive device of high-quality flooring. The most suitable garage coating is a concrete screed. On how to fill the floor with concrete with your own hands in the garage - further in the article.
The floor is made of concrete in the garage. Why concrete?
The floor in the garage should be:
- Moisture-resistant.
- Wear-resistant.
- Durable.
Like any other sexual coating, the concrete screed has both its strengths and weaknesses, which, however, does not prevent it from being the most popular solution for garages. Of the advantages of concrete floors, you can note:
- Excellent waterproofing. Unlike wooden floor, concrete practically does not pull moisture, which is very important for the storage of the car.
- Wear resistance. The concrete screed does not destroy under the influence of the mass of the vehicle, which is very important in its daily use.
- The ability to align the floor. A bulk concrete floor can adjust its height. Since often garages are built on uneven sections, a concrete tie can align the floor of such a garage in terms of level.
True, it is worth noting that the laying of the screed in the garage from concrete has its drawbacks:
- First, it is a very laborious job. Filling of a layer of 10 cm in a standard garage of 6x4 m in size 2.4 m 3 concrete. Issuing such a number manually and then lay quite difficult.
- Secondly, a concrete screed due to the destruction of the upper layer creates a lot of dust indoors, although this problem is solved by applying special compositions.
Device floor from concrete on the ground with their own hands
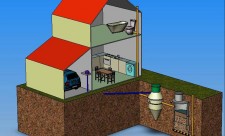
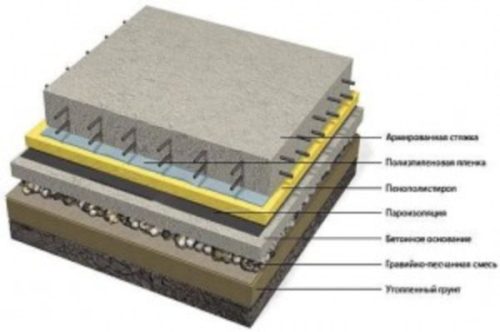
Concrete floor is a multi-level "cake", each layer of which has its own value:
- Sole. It is littered from sand or gravel. The thickness of the layer depends on the type of material used. It is about 50 mm for sand, for gravel - up to 150 mm. After laying the layer necessarily tampering.
- Waterproofing. This layer should prevent moisture outgoing from the soil, penetrate inside the screed. Otherwise, this can lead to its destruction. For these purposes, you can use runneroid or polyethylene film.
- Insulation. If the garage is planned to be missed, then it is necessary to take care of the heat insulation of the floor. Heat losses across the floor in some cases reach 20%, so for a warm garage on the insulation, it is better not to save. The most suitable material for the heat insulation of the floor is polystyrene foam.
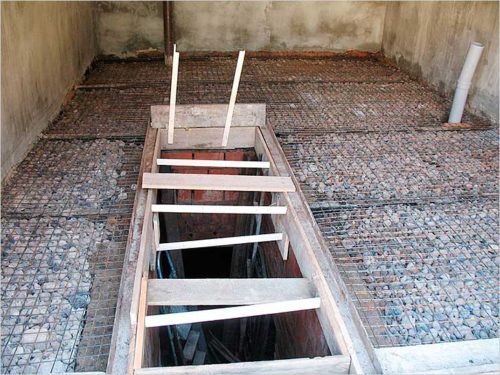
- Reinforcing layer. To improve the operational properties of concrete, it is better to lay it on the reinforcing grid.
- The last layer of the field is directly concrete.
Preparation of soil to floor flooring from concrete in the garage
It is impossible to carry out work on the unprepared soil. The movement of the latter can lead to concrete cracking, which will subsequently lead to additional costs of its repair. With a large corner of the soil or high probability of its flooding groundwater, it is better to abandon the fill of the floor with concrete. In this case, it is advisable to make a high floor of reinforced concrete plates on the pile foundation.
If there are no problems list listed, you can begin the preparation of the soil. It is in the sealing of its layers and subfields of the sole.
Phased procedure for performing work:
- Before starting work, remove the layer of bulk soils. Their low density can cause movement in the winter-spring period, which threatens the destruction of the foundation. The depth of removal of the land layer can reach 90 cm depending on its density.
- Then it is desirable to lay 20-30 centimeter clay layer, which will be excellent moisture protection. The soil in front of the soles must be carefully tumped by vibrating plates. In order not to buy this tool for a single case, you can rent it.
- To control the level of materials in the corners of the garage, stacks are installed.
- After the dumping of the soil, the sole is poured. For her use sand or gravel.
- After completion of the work on the submission, the layer will be tram again.
Floor flooring work from concrete
After the sole is ready, you can start the installation of the floor. The following layer after gravel or sand should be the reservoir of waterproofing. For its device on the floor surface, PVC film rolls out or rubberoid (Rubext).
The order of work at this stage is the following:
- The material is laid out of the pectorist of 20-25 mm with subsequent sealing of seams using a tape or other adhesive tape. On the perimeter of the walls, waterproofing is standing up to exclude direct contact of the latter with the floor.
- The next step is stacked thermal insulation plates. The most optimal option for floor insulation in the garage in the ratio of "price-quality" is polystyrene. Plates are stacked in a checker order, like brickwork with mandatory seams of seams. If the garage is not heated, the pouring of the concrete of a warm floor does not make sense with their own hands.
- After laying the insulation, another layer of waterproofing is laid on top, from the same materials.
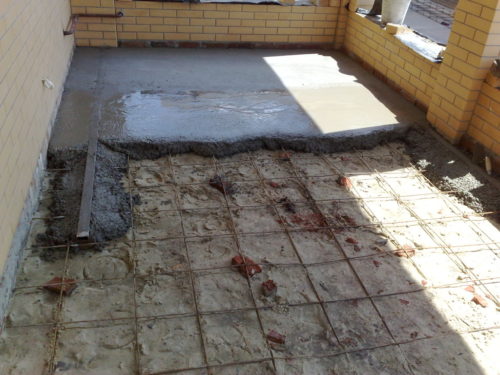
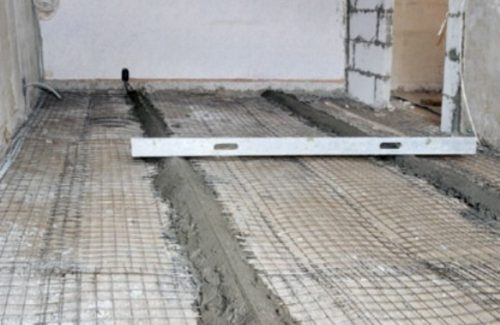
- The next step is to install the reinforcing layer. The reinforcing grid is placed to give the layer of additional strength concrete. To do this, you can use the finished mesh with a cell 100x100 mm or 150x150 mm, or make it yourself from the reinforcement or circle with a diameter of 6.5-8 mm. The second way is a little cheaper, but it takes much more time. Metal stakes are used for fastening the mesh or reinforcement, as it should be in the middle of the concrete layer.
Pouring a rough floor of concrete with your own hands
For the pouring of a rough base, concrete based on cement 400 grade and river sand in a ratio of 1: 3 is used. Before kneading the concrete sand should be carefully sissing. The presence of large pieces can lead to uneven laying of the material and the formation of cracks.
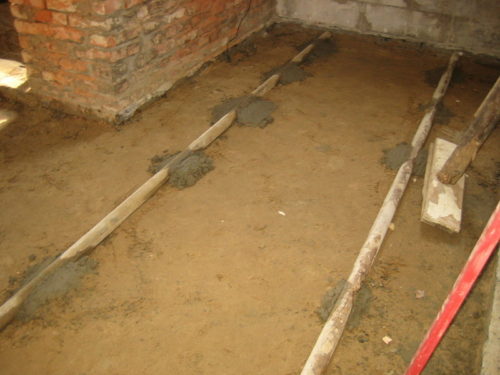
Before starting work on the surface of the floor, lighthouses are installed. They can be steel (sold in construction stores) or wooden. As the latter, wooden slats are often used to 15 mm thick. This option is cheaper, however, after removal of the regards, you will have to close the remaining ditch.
Lighthouses are installed on the solution in terms of level. Typically, the thickness of the initial (draft) layer of concrete is from 60 to 100 mm. The position of beacons can be adjusted until the solution is captured.
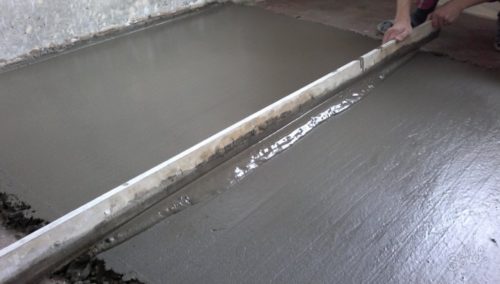
After that, you can start the fill. With a large area of \u200b\u200bwork, the bay of the dome concrete is made with their own hands with strips wide width of no more than 1 meter. The solution is mixed in special Badjah or concrete mixers. The second option will significantly speed up the process of conducting the work and make the concrete better. If the solution will be interpreted in Badier, sand and cement is embanked in the specified proportions and is thoroughly mixed with a shovel. After that, water is gradually added to normal concrete consistency. It should be not too thick, but not liquid. The solution is interfered until a homogeneous mass is obtained so that there are no dry inclusions in it.
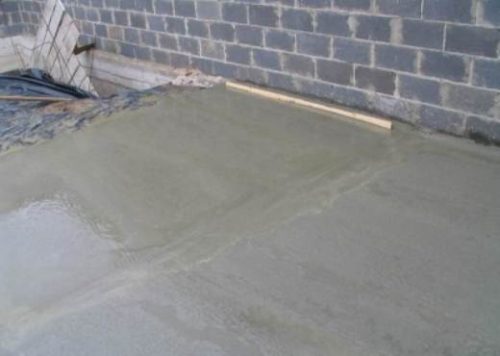
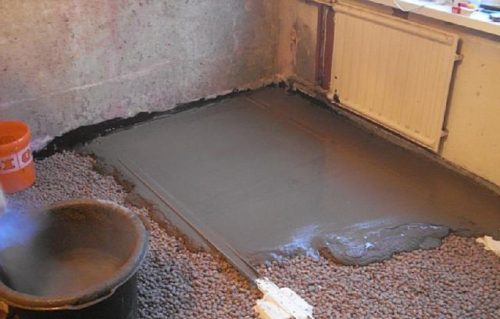
A solution is applied in small portions and stretched over the surface using the rule. After the end of work, it is not completely frozen concrete covered with a plastic film. It is done to increase the time of solidification of the solution, which contributes to an increase in concrete strength. If the work is carried out with dry and hot weather, the concrete must be moisturized. Apply the strength of concrete will be within 3-4 days.
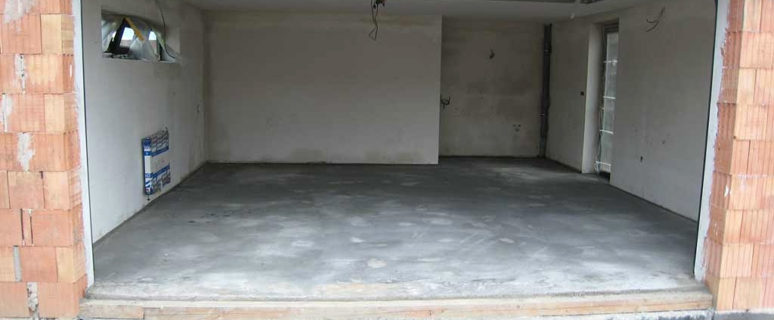
The last stage will be the pouring of the first floor in the garage from concrete with their own hands. The final screed is poured in the same order as the draft coating. So how exactly it will experience most mechanical and chemical loads, it is fixed. To do this, cement milk is added to the concrete. This is a mixture of water, cement and a special plasticizer. Milk is mixed up to the thickness of sour cream. After soaring, such a floor will be quite strong, however, its fortress is not enough to withstand the effect of studded rubber or auto chemicals. To do this, apply a protective layer on the floor covering.
Applying a protective layer on the floor in the garage

To apply a protective layer of concrete floor in the garage, a polymer coating based on polyurethane or epoxy resin is most often used. They can be three types:
- Thin layer coating.
- Bulk floor.
- Highly filled floors.
The first type of coating is applied as ordinary paint. For this, a solution of a dry mixture, which includes a pigment dye, is mixed with water in the proportions specified by the manufacturer. After that, an ordinary roller and a wide brush is applied with a finished solution to the surface of the concrete floor. Average consumption of such a mixture of 0.5 kg / m 2However, on the non-primed surface or at high porosity of the upper layer, the consumption of material can significantly grow.
Bulk floors are applied for several other technology. The solution is poured onto the surface in large volumes. Then, with the help of a rubber roller, it is distributed to a smooth layer throughout the floor. Then, to remove air a layer of bulk, is powered by a needle roller until the end of the polymerization process.
Highly filled floors due to high laboriousness and cost for applying the garage tie are rarely used.
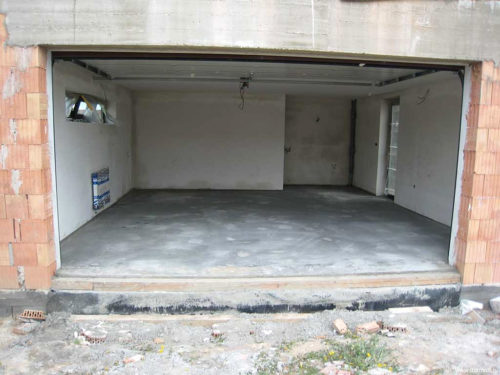
Filling the floor in the garage concrete with her own hands: photo
Fill the floor concrete with her own hands: video
Calculators


Correct tool sharpening. How to sharpen the tool with your own hands 29.01.2017
In the process of operation, the cutting edges of the instruments are stupid, which leads to a decrease in the quality of processing parts and blanks, to a decrease in labor productivity, as well as to the wear of the tools themselves. Right ...


Themed photos