Build kitchen corner Interior items

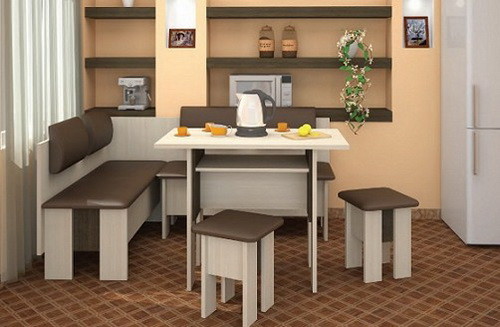
Functional furniture is able to make something more from your kitchen than just the place of food. For example, the beauty and practicality of the kitchen sofa will be located to spiritual conversations and turn the dining area into a real homeie.
Of course, a huge number of furniture companies will gladly make you a kitchenette. But buying serial furniture remains still cheaper and faster: like the model? Wrap it!
And here, the long-awaited acquisition of your home, but only the view of him is unusual: packaging, but boxes. What to do with it? Tell us our kitchenware assembly instruction.
Where to begin?
Before proceeding, you should carefully examine the future product:
- We look at the packaging from all sides and check its integrity. If it is broken, it is possible, damaged and the contents.
- Check the number of boxes.
- With the help of a stationery knife, calling it under the packaging tape, reveal the packages.
- We carefully inspect each item from all sides to the subject of visible defects: chips, cracks, breaks, spots, etc. We pay attention to the corners, edges, soft products. Sews on the upholstery should be even, without wins and outbreaks.
Important: Do not throw away the packaging until the end of the installation! And in no case, do not proceed to the assembly, if the disadvantages are revealed. Take a picture of the defect and contact the store.
So, lay out the contents of the packages. Usually, in addition to the basic components, the manufacturer puts the necessary fasteners and loops. The total weight of such a cargo is about 90 kg. But if you ordered a corner at a sawing enterprise, then for assembling it from a 16-18 mm thick chipboard, you will need:
- confirmates "Five" with a length of 50 mm and a diameter of 7 mm;
- tree drill number 5-6;
- sucks;
- drill;
- screwdriver (no matter what power it will be, the main thing is that it is faster and easier to);
- hex confirmable key;
- loops piano or canopies;
- furniture boys;
- 4x16 screws for mounting corners;
- self-tapping screw 3x20 for piano loops;
- self-timber 4x30 to install the spyers;
- plugs (self-keys or plastic);
- roulette, pencil, screwdriver curly and straight.
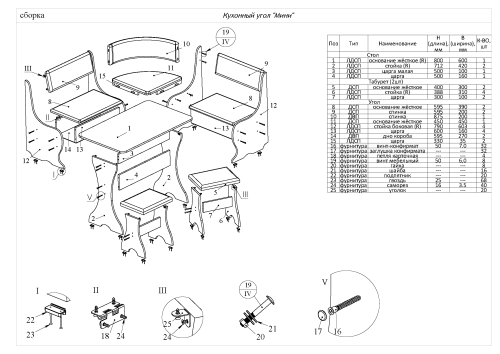
Kitchen Corner Assembly Scheme
For convenience, we organize space around: better if it is an empty room or space of at least 8 meters. On the floor there are no extra objects, good lighting. Put all the accessories in a separate place, for example, on the newspaper sheet. We add all the details by type so that we see what we have how much.
We collect the hull of the bench, starting with the extreme elements:
- We take the sidewall of the long part, screw to it the corresponding front and rear panels. We plant all this on the confirmates and the seasons to provide the product with the necessary strength.
- We put the design on the floor on the side panel and in the dockets for the Fiberboard, we drive the rear cap.
- We roll on top of the second sidewall (the one that is joined with the corner section), and screw it.
- Further, krepim on the self-tapping screws furniture scans or what is due to the design of the corner for its contact with the floor.
- We take an external sidewall from the short section and repeat the procedure: the front and rear parts, the Fiberboard in the groove, the second sidewalls, the spikes.
Please note that if your model assumes external pads on the side, then they are installed already after assembling the case.
Mount the soft part when both housings are ready. Sheds on the seats are screwed in two places on each section from the reverse side. So, when opening the cover, they will not be visible. Next, try on the back. If you have a serial version, know: lateral drills are hidden behind the soft material. Before faster, click on them and make a preliminary EUROMINT.
Now you need to combine a large and small bench with a radius. If it is a frameless section, first we bind the back with the seat and install E to the place. Before you sharpen, check that both seats are well open. First of all, we are screwed by the Eurovints, and then the bottom of the radius.
In the angular element with the body from the chipboard, first screwed the basis, and the seat and the back are installed on it. If the latter does not enter, try changing the angle of the entire sofa: make it a little sharper. If it does not help, perhaps you got a radius from another model.
Install the plugs in the places of configmatics.
Note. When the corner represents a single design and its sections cannot be rearranged, you need to take fasteners with particularly close attention. At the conscientious manufacturer, everything should be adjusted so that after the assembly, all the details are tightly adjacent to each other, no gaps, unnecessary holes, around the screws, the coating does not crack and does not crack. The presence of grooves is a sign of the quality of the model. Periodically, the connections will have to lubricate and pull up so that your product does not creak and not loosened.
We continue to assemble the kitchen corner and on the queue table. Take the basis of the most popular option. We put on the floor the first side and attach the screed. If you look at the finished condition, then the upper, narrow, perpendicular to the floor, and the two lower - T-shaped (strictly observe an angle of 90 ° C between them). In the same position, we put the scales.
When assembling the table it is very important that the countertop lay on the floor. We transfer to her our design and mounted with the help of furniture corners.
Stools can now be collected on the table, pre-shopping it with cardboard. The principle is simple: a detail is put on one sidewall that gives the strength of the design and is covered with the second. I turn up the upside down, cling the grooves.
We produce this procedure with all the tops, and soft parts are screwed at the last moment.
As you can see, collect kitchen corner even a teenager. The beauty of the material chipboard is that it does not have any sites, cracks and internal voids, it is light in processing and assembly. And it is still strong enough, you will see if the operation of your furniture.
Choosing a kitchen set, pay attention not only to its appearance, but also on quality, then it will rejoice you for a long time and your family.


