Installation of retractable gate Useful advice

If earlier the automatic gate was considered a sign of high social status, now they are often found even in small houses. The decline in accessories has made them affordable for the average homeowner. Do not even talk about the convenience of such a solution. Now there is no need to leave the car in unfavorable weather to open entry into the territory, it is enough to press the button on the keychain, and they will open themselves.
Content
- Types and characteristics of retractable gates
- Installing pillars and foundation of pull-out gate
- Selection of accessories of retractable gate
- Making a frame of drawing of drawdractory gates with their own hands
- Installation of stretch gate
- Retractable Gate Scheme: Photo
- Retractable gates do it yourself: video
Types and characteristics of retractable gates
Currently, the most popular types of automatic gates are the following:
- Suspended gate. Such models are suspended on a special beam, which connects two supports. The beam beam is mounted on the suspended rollers with an electric drive. The suspended gate is distinguished by a simple scale of manufacture due to the lower length of the canvas. However, the passage of oversized technique through them will be impossible.
- Swing gates. The advantage of such models is the minimum of the required place to accommodate sash. They are perfect for households with a limited width of the yard. However, the cost of fittings for swing gates is quite high.
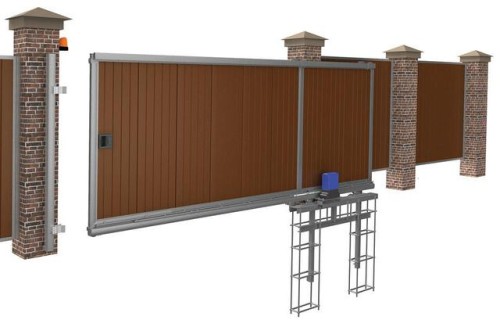
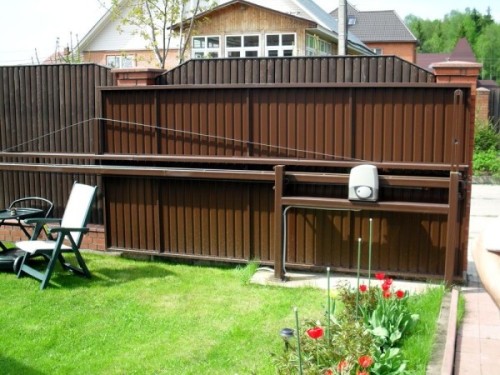
- Retractable gate. The principle of operation of such a gate is practically no different from suspended. In this case, the sash does not hang to the beam, but relies on it. Due to this, the upper gabritis of the gate is missing and does not prevent the passage of large-sized transport.
About how to make a retractable gate with your own hands - further in the article.
Installing pillars and foundation of pull-out gate
Work on the installation of retractable gate begins with the installation of support pillars and foundation.
For this work you will need:
- Channel.
- Armature.
- Cement.
- Sand.
- Pipe profiled cross section 80x80 mm.
- Brick.
Order of work:
- First of all, the columns of the gate are installed. To this work, it is necessary to approach very responsibly, since any deviation in the location of the pillars and their verticality can affect the operation of the mechanisms of the retractable gate.
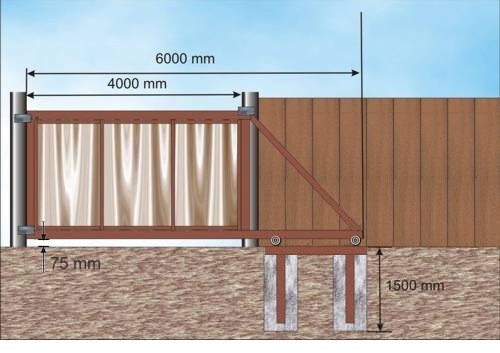
- The construction of pillars begins with the construction of the foundation. Its depth must be at least 1 m is the magnitude of the fruit of the soil. A less deep base during frosts may cause a vertical column deviation.
- The pit under the foundation is digging with brickwork, which is mounted around the pipe. On the bottom of the pit swells sand and thoroughly tamper. The formwork is installed inside, reinforcing design from reinforcement.
- Then the pipe is inserted into the middle, which will be a column frame. At this stage, it is possible to start its wires to automate the gate, if necessary. Even if it is not planned at the initial stage, the installation of the automatic drive of the gate can be laid for the future.
- Next, the pipe is exhibited by level and welded to the reinforcing structure.
- The next step in the formwork concrete solution. It is made from cement and sand in the proportion of 1: 3. To save time you can make two columns at the same time, because in order for the concrete to gain the necessary strength, you need to wait a week.
- When concrete cools, you can start a laying. In places where metal structures will be attached to the columns, mortgages are installed. They are made from a corner and a piece of reinforcement, which is welded to the pipe. The mortgage length must be at least 80 mm. Each of the columns is made in 3 mortgages.
- The column code of the gate is installed, the foundation of the sash poured. To do this, the trench is rotated close to the post. The depth of the trench should be at least half the width of the gateway. Its width should be at least 450 mm.
- After that, as in the case of the fill of the foundation under the poles, it is necessary to put sand or gravel on the bottom of the trench. Then the metal structures are welded for mortgage from the channel 160-200 mm wide and reinforcement with a diameter of 10-12 mm. The length of the armature legs should be equal to the depth of the trench. As a result, the mortgage must be installed on the level of the roadway. Metal structures are laid in a trench, aligned in terms of the level and poured concrete.
Selection of accessories of retractable gate
To install the retractable gate, the following fittings are used:
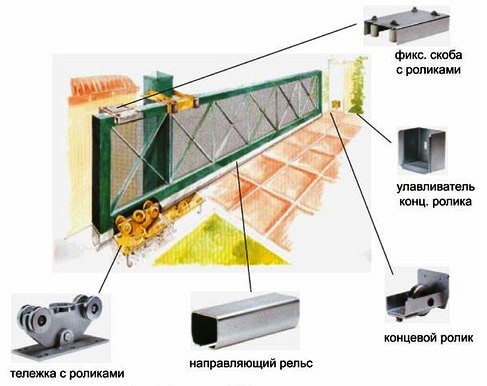
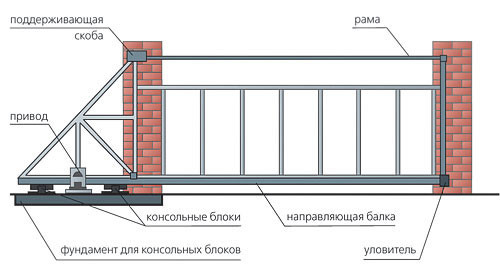
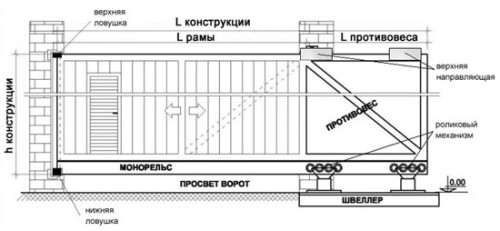
- Lower guide. She is attached to the goal sash. Thanks to her slide on the rolleropor, the flap of the gate will open. The length of the guide should be one and a half length of the gateway. It is a steel channel with rounded ends.
- Adjusting plates. They are not included in the standard set of fittings and ordered them separately. Thanks to the adjusting plates, roller supports can be set so that the sash is easily and without distortion.
- Roller support. They are installed on the mortgage, and the guide slides on them. A pair of roller supports is usually mounted.
- Top roller.
- End roller.
- Nizhny and upper catchers.
- Plugs for guide.
When choosing a set for retractable gates, especially roller supports, it is necessary to pay attention to the quality of their manufacture. Cheap parts are constantly breaking, especially if we are talking about low-quality bearings. Because of their destruction, the gate begins to slide badly, which leads to overheating of the actuator and its failure. Replacing roller supports - the process is quite time consuming, so it is better to buy a set more expensive, but better. It is better to prevent the use of plastic rollers, preferred steel with reliable bearings.
All components of the kit must be made of stainless steel. This question cannot be a compromise. The thickness of steel for guides and catchers should be at least 3 mm.
Making a frame of drawing of drawdractory gates with their own hands
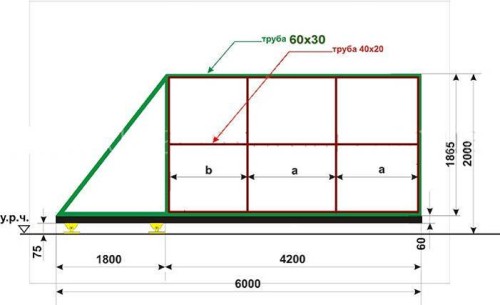
The frame flap frame is manufactured as a rectangular trapezium. The upper part of the trapezium in length is equal to the length of the gateway, the lower is 1.5 length of the top. There is a diagonal tube between them, which will give the design additional rigidity.
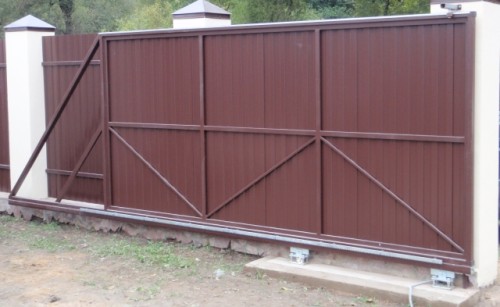
The drawing of the retractable gate will consist of an external and internal frame. The latter will be attached to the professional flooring. For an external framework, a pipe with a cross section of 40x60 mm will be used, for the internal cross section of 30x20.
Order of work:
- Before starting work, it is necessary to make a diagram of the drawing gate with their own hands to know what long it is to cut the pipe. The ends of the segments that will be connected at a right angle are trimmed at an angle of 45 °.
- After the cutting is finished, the metal is cleaned of rust and stupid.
- Now you can start the assembly. It is produced from below. The first thing the guide is installed on temporary supports (small cuts of the pipes that are welded below) with checking its position position. The lower pipe of the external frame is welded to her surface on the tag. The tapes are made every 600 mm, not less than 20 mm long. The pulmonary of the bottom pipe frame is checked by level.
- Then the vertical exterior frame racks are welded. The first is at the end of the lower pipe, the second at the distance equal to the length of the portal opening from the first. The verticality of the racks is checked by level. The next step is welded upper crossbar with a mandatory level check. Then the crossbar and the end of the bottom tube are connected by a diagonal.
- Next, you need to weld the inner frame. To do this, use a pipe 30x20 mm. On the inside of the gate, the inner frame is welded to the level with external. First the frame is welded around the perimeter, then the horizontal pipe is welded along the middle of the internal frame and two vertical segments.
- After the framework of the framework of the framework, all seams need to be cleaned with the help of a grinder and progress. Next, the design is painted with a kraskopultum or brush.
- The last step in the manufacture of the sash frame is sewn by a professional flooring, which is attached to rivets or self-drawing. Now the sash is ready to install.
Installation of stretch gate
This stage is the most difficult and responsible. It depends on the further work of the entire mechanism of the retractable gate.
Order of work:
- The first stage of the installation to the mortgage on the posts is welded naschalniki. They make their pipes 60x40 mm. In the near Naschelnik, a neckline is made to install the top roller.
- Next from the guide, temporary support tubes are cut off, and it is installed on roller supports that are put on the mortgage chaserler. In parallel, the top roller is welded.
- The next step is to set rolleropors in such a way that the sash opens and closes easily. To do this, the roller carriage is grabbed by welding to the chaserler. Then the gate is checked in terms of level and rolled. In the event of problems, the carriage is cut off from the channel, adjusted and again grabs. The process is repeated until the sash is installed perfectly.
- In order to be able to adjust the position of the vertical carriage, you can install adjusting plates. In this case, the rolleropore carriage is welded to the mortgage chaserler, but the adjusting plate with studs.
- After the gate is exhibited, the bottom and upper catcher weld.
- The lower catcher is welded to the overall side to the end roller, which is installed in the end of the sash, drove on it and raised the gate a little up by 3-4 mm.
- The upper catcher is welded in such a way that it firmly holds the closed sash at the top.
- After the end of the installation, the gate is checked several times on the smoothness of the stroke. If everything is installed correctly, you can clean the seams and paint the entire design.
- Next, you can install an automatic opening system that will work on remote inclusion. This work is better to trust professional installers, because the set of such a system is quite expensive, and the wrong installation may cause its failure.


