Bath of slagoblock with their own hands Baths, saunas and pools
Do you want to build your own bath, but are limited in the budget? There is an output - construction from slagoblock. The durability of the structure depends on the quality of the building material. Before buying, visit the suppliers more popular in your area. Be careful! The price must match the quality! If you can not visually distinguish high-quality blocks, take a specialist with you.
Content
Pluses of slagoblok.

- High thermal insulation indicators.
- Low weight.
- Not exposure to mold and fungus.
- Not susceptibility to fire.
The slag block is a kind of brick in which there is no sand. Instead, slags are used, clamzit. These sand substitutes give low weight, which allows you to produce blocks with a size of 400 x 200 x 200, instead of a brick 250 x 125 x 54. Such an increase in size at low weight and low thermal conductivity and made a slag block of a popular building material. The price of the slag block in terms of the volume below the prices of simple brick.
Build a bath

Like any construction, the construction of a bath has its own order or a sequence of actions that are required to comply with:
- drawing up a plan of structure;
- fill the foundation;
- walling;
- construction of the roof;
- exterior finish;
- interior decoration and insulation.
What is the work plan
The presence of a plan primarily provides an understanding of the volume of materials that will be required to work. When calculating blocks, just in case, add a few pieces to the calculated number. In the same terms it will be possible to calculate how much cement, sand, materials for insulation, roofing, etc.
How to calculate the number of blocks? Suppose the overall size of the bath is 5 * 4 * 2.5 meters. On a wall of 5 meters long for laying one row, 12,5 pieces will be required, on the four meter wall - 10 pieces. And in height - 6 pieces, taking into account the seams. Total on the construction of the "box" will require about 260 pieces. Do not forget that you need to subtract the window size from the "rough" calculation (if it is) and the doors. Additional partitions will require additional quantity of building materials.
Foundation

The successful arrangement of the foundation depends on the soil on which it will be located. For the structure of the blocks, the stony soil is best suited. In this case, there is no need to further strengthen the foundation. If under the future bath, clay sand and peatman, you will have to do a classic ribbon or pile foundation.
During the construction of the foundation, it is necessary to take into account that slag blocks are hygroscopic. To avoid this, set the foundation above the soil at least than 500 mm. And on top of it, it is mandatory to make waterproofing.
To build a belt foundation, you will have to first produce earthworks. At the perimeter of the future bath, a yum is a depth of 0.5-0.7 meters, a width of 0.3-0.4 meters. A sand-gravel mixture with a thickness of 3-5 cm is poured onto the bottom of the resulting pitaway.
The figure shows the incision of a ribbon foundation.

The easiest method of waterproofing foundation is a bitumen coating. Bitumen is sold in the form of bars. For the preparation of the required composition, the exhaust oil is poured into the container and the bitumen is stacked. Percentage ratio: 30% oil, 70% bitumen. The container is placed on fire (bonfire, gas stove) and heats up.
Under the influence of heat, bitumen melts. As a result, we will have a uniform mixture that can be applied to the surface of the foundation. It uses a roller or brush to apply it. It is starting to deceive from the base of the foundation and about the height of 20 cm above the ground level. After applying 2 -3 layers, waterproofing work can be considered complete.
NOTE! Capacity with bitumen requires constant heating. During operation, it should be warm.
Bitumen closes all the pores of concrete and prevents moisture penetration. The timing of such waterproofing ranges from 5 to 20 years. It all depends on the level of humidity and from other external influences.
The modern building market offers several types of insulation of the coating type. These are bitumen polymer mastic designed for hot or cold application to the surface. Mastics also differ in consistency. The choice depends on the future owner of the bath.
Walling
After the end of the work on the category of foundation, we proceed to the walls of the walls. The slag blocks are fitted in the same way as ordinary bricks. For reliability after each third layer of blocks, the reinforcement grid is laid.
IMPORTANT! In the wall, behind which the windows steps are planned better not to do!
Preparation of solution
When preparing the solution, it is necessary to remember that the bath is a room with high humidity, even in the future and will be waterproofing walls, it is better to care and prepare a solution for premises with high humidity.
The base of the M300 or M400 brand is suitable as the basis, the ratio of cement and sand is from 1: 3 to 1: 6, the ratio of water to cement is approximately 1 part of the cement of 0.8 parts of the water. Sand for the solution is sifted through a sieve. The perfect is considered a river sand, with an average size (2.5 mm fraction), it should not include trash, branches, large stones, clay or soil lumps.
For the preparation of the solution, it is possible to use construction stretchers or a capacity of volumes similar to them. Alternately, cement and sand is being added to the dodge, water fills in compliance with proportions. As a result, a solution should be obtained, a consistency resembling a thick sour cream. It is recommended to immediately run it to work, in an hour - two, it will begin to thicken.
We build a wall

To work, you will need:
- level;
- lace (thread, twine, fishing line);
- hammer;
- trowel;
- plumb;
- order.
The masonry starts from the corners. In the corners, orders are installed, on which tags are made taking into account the thickness of the slag block and the seam. Between them stretches the lace through which the bricks align.
The level is worth checking as often as possible, let it look a bit tall, but then it does not have to shift.
Laying blocks always begins with an angle of future building. The trunk is buried the finished solution and laid out on the foundation. Take the unit and put on the foundation. The back side is tapping on the brick, aligning it in a row. After that, the second brick is taken and the displacement of 10-15 mm is set close to the first. The slot between the blocks is filled with a solution. Once the block, set up the level and you can take the third block.
IMPORTANT! When laying a block, constantly check it in a building level, so if not to eliminate irregularities.
There is a false belief that filling out the emptiness inside the block will increase the reliability of the masonry. That is unlikely! But the thermal insulation properties block will lose.
Bloofing

After the box (walls) of the bath is built, the construction of the roof begins.
- For ceiling beams use a timing of 100 x 100 mm or a log diameter of at least 100 mm. In order to lay the ceiling beams, in the wall during construction, they leave the opening where the end of the beam will fall. Ceiling coating will then be fixed to these beams.
- Ceiling beams are required to seal. It is necessary to protect the beams from condensate, which is formed when the bath is heated. The moisture that fell on the ends of the beam leads to their winding.
- The depth of sealing the end beam should be at least 10 cm. The lumen between the beam end and the inner wall is close to cement and is maintained by cement mortar.
- In order to set the rafters on top of the laying, the bar or logs are fixed. It will be the base for rafters. The rafted themselves, according to the drawing, collect better on Earth. The rafter step can be from 0.6 to 1 meter.
- The rafted rafter assembled on Earth, climbs up and fixed in pre-prepared grooves made in the laid timber. The installation of the installation of the rafter must be carried out on a vertical plumb. Take track so that the outer facets of the rafter were in the same plane.
- The next step will be laying the crate. An unedged board of 150-200 mm width is quite suitable for the crate, the step of its location can be different. Given the fact that the surface of a small roof, it can be laid end to end. The departure of the crate for extreme rafters should be at least 200 - 250 mm.
Bake
Variants of bath of the furnace actually several fans classical bath prefer classical stone furnace (amateurs but such baths are not building blocks of it). But the construction of the furnace quite time-consuming process that requires certain skills. The fact that the furnace is placed around the circuits and each layer of masonry, has its configuration.
Skills acquired when laying wall may not be sufficient in the construction of the furnace blocks. Therefore, for baths of the blocks it has a sense to put metal welded furnace. It can be ordered in any workshop, where there is welding machine and it will cook at once and has a furnace, water tank and heater. Or to acquire a modern oven with electronic control.
All again depends on the desires of the future owner of the bath. The main thing - the construction of a stone stove or stoves produce metallic mounting to the start of the internal and external finish. Modern stove can be installed after the execution of these works.
To set a stone metal furnace fabrication requires separate foundation which is independent of the main one. Its depth for the stone oven must be at least half a meter, and the length and width of 10-15% greater than the size of the furnace. Roughly the same parameters for the furnaces of metal.
Exterior finish
External finishing bath, the materials used, the style, the colors - is a place of unlimited imagination. BUT! The foundation has the ability to face down for a year or two, so before you engage in decoration, better check with the neighbors as they behaved in the bath during the first year.
Scheme finishing types: on the wall surface of the stacked insulation, over which is already installed lath made from wooden beams, with a pitch equal to the width of the insulation. Since the height of the mat is about 100 mm, the crate will have to do in two steps.
The second timber is stuffed at first. The openings between the bars formed mats are laid on top of the insulation and the multilayer structure sutured selected material. This may be a siding, or siding.
Inner trim and insulation
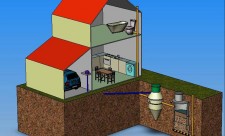
Cinder block, though having a low thermal conductivity, but basically it is a stone, and that would begin activities bath bath should be warm inside. This will require a timber for the manufacture of crates, the cross section 50x50 mm is enough, vapor barrier, insulation, waterproofing. Figure 1 shows a scheme of warming bath inside.
Figure 1. Schematic Internal insulation bath

Calculators


Correct tool sharpening. How to sharpen the tool with your own hands 29.01.2017
In the process of operation, the cutting edges of the instruments are stupid, which leads to a decrease in the quality of processing parts and blanks, to a decrease in labor productivity, as well as to the wear of the tools themselves. Right ...

Themed photos