Frame profile for plasterboard: features installation Construction
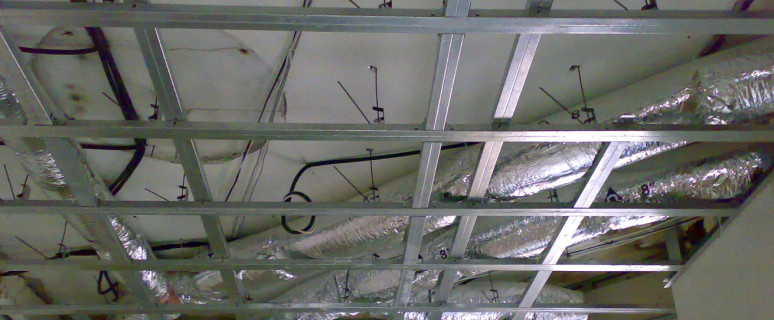
Every year the drywall is becoming increasingly common building material. Surely the whole point of its low price. Almost every owner can afford this building resource, while not limiting themselves in terms of creating original designs and design solutions.
Content
In contrast to the simplicity of the material, the process of creating any design can be incredibly difficult. It all depends on the specific project, as well as the scope of existing works.
Particularly seriously need to pay attention to the configuration profile, which can be quite different depending on the specific conditions.
To create a truly reliable and durable framework that is easy to bear the enormous weight of the plaster of the Mother, you need to know about a number of nuances, which clearly will have to face.
In this article we will focus on a framework on the basis of which the arches, ceilings, and walls of plasterboard and many other objects. Indeed, the process is time-consuming, but using the drywall can turn an ordinary "gray" apartment in a really cozy place.
The main advantages of plasterboard use
Before making any conclusions associated with the use of drywall, you need to know about some of the positive sides of the material. It is worth saying that the plasterboard and the metal frame are inseparable concepts. It is based on these construction resources and impressive objects within any room are created.
First of all, plasterboard is a practical material that hides electrical wiring without any problems, as well as the most complex lighting system. Therefore, the full ceilings from drywall do not have decent analogues. When using the framework there is an opportunity to create unique design solutions.
With a sufficient height of the ceiling, it is possible to device in the cassette air conditioner ceiling. Definitely, it has much more advantages than classic equipment.
In addition, thermal insulation can be placed in the space between the wall and drywall, which will ensure the stable temperature regime in the cool seasons.
Special attention should be paid to the design of the drywall surface. After the plaster, the possibility of applying to the surface of various drawings. Moreover, with the help of a frame, you can create a whole composition with the original texture.
Disadvantages of plasterboard and frame base
As it usually happens, even the highest quality things have their drawbacks. Any plasterboard structures that are under the influence of moisture, sooner or later begin to deteriorate. At the very beginning, the surface begins to deform, after which the main properties lose the whole design.
Thus, drywall can be applied far from all cases, and even moisture-resistant material will not always help avoid negative influence.
It is also worth saying that to create unique frameworks and whole designs it is necessary to have tremendous experience. Even in some simple actions, quite complex details are hidden. Thus, if there is no confidence in your actions, you must refer to the specialists.
Well, in conclusion it should be noted that the plasterboard itself is too sensitive, especially if you compare it with many other construction resources. Therefore, even the simplest action can either damage the surface of the gypsum material, or to make it unsuitable for further use. For example, during the finishing work, it is necessary to carefully monitor the primer layer, as the plasterboard can easily change its shape.
Type of drywall and profiles for creating a frame
Classification of plasterboard
Before the acquisition of plasterboard, you need to know that there is a large number of various varieties of this product. Of course, the choice of one or another variant depends on the existing conditions in which the plasterboard will be applied. In addition, it is worth paying attention to the scale of construction work.
- The abbreviation GLK means that the products are a gray sheet whose thickness is from 8 mm to 16 mm. Sheet width - 1200 mm, and length can reach 4000 mm. This is the most common material that is used in ordinary residential premises.
- G Clac is moisture-resistant plasterboard. Its dimensions are approximately the same as the past version. The only difference is the presence of hydrophobic additives that allow the use of plasterboard in rooms with high humidity. At the same time, it is categorically recommended to use this product in the bathroom.
- Less often applies GKLO. This material that successfully confronts fire, which is why such plasterboard is called fireproof. There are no particular sense in ordinary residential premises, however, for stores and warehouses, this is the best option that will not allow to spread a possible fire.
- Glevo is the most expensive version of hypercathone products. It combines moisture resistance and refractory properties. The thickness of one such sheet is limited to 16 mm. The width can be 600 mm or 1200 mm. Length often reaches 4000 mm.
It is worth noting that it is necessary to choose plasterboard not only by its properties, but also in dimensions. For example, to create a ceiling of plasterboard, it is necessary to use sufficiently thin sheets - up to 10 mm. If you need to create an arch, then the sheets of 6.5 mm thick are suitable.
Profile classification
To date, several varieties of profiles are actively used. They are quite enough for the majority of construction work related to the creation of a frame.
- PS is a rack profile that has a p-shaped form. The backbone is often from 50 mm to 100 mm. Often this element is used as vertical racks.
- PP abbreviation is the designation of ceiling profiles that have three longitudinal grooves. The dimensions of this element are 60x27 mm. Based on these profiles, plasterboard ceilings are installed.
- Mon - is a guide profile. The width of this element is often 40 mm, and the base can reach 100 mm. Most often, the guide profile is used to erect wall structures. This element is easily fixed to the ceiling and wall. Thus, on the basis of the PN, a peculiar framework is created for the main design.
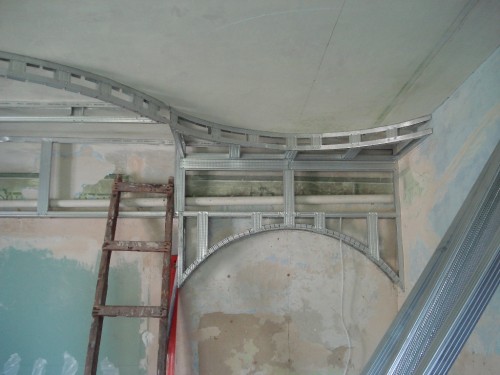
- To create the archer, the pa. The arched profile allows without any additional manipulations to create a high-quality frame for the passage between rooms. In some cases, PA has enough original forms that are great for creating unique design solutions.
- PU - corner profile. This building element qualitatively strengthens the angles that are often used in massive structures.
- The PNP is a ceiling guide profile, it is attached to the walls of the room. The dimensions of this element are 27x28 mm.
There are also some other elements for creating a metal frame. For example, a peculiar coupling can be used to combine long profiles.
Do not forget about the element that is called "crab". With it, you can combine intersecting parts of the frame. You can also find a two-tier crab, which is the basis of the top level, while fixing the bottom of the metal structure.
Very often in construction an anchor suspension is applied. With this element, you can easily control the height of the space between the main ceiling and the drywall base.
In turn, the direct suspension is an element that is mounted on the basis of the surface of the wall or ceiling, after which the fold occurs on selected directions. When using the suspension, the space between the wall and plasterboard is limited to 60 mm.
Mounting Plasterboard Frame Mounting For Ceiling
It should be noted in advance that the process of assembling the framework includes a lot of stages, each of which has colossal importance. Moreover, it must be borne in mind that any non-professional action can instantly lead to failure of the entire project, so if any difficulties occur, it is necessary to seek help from experts.
Before starting to build a frame, it is necessary to determine the distance between the main ceiling and the future plasterboard base. First of all, it must be done in order to analyze the space that will be affordable after all works. Obviously, the average apartment does not have enough space to create such a ceiling, but in private houses, as well as in some apartments, the ceilings are high enough.
In this case, there is no need for too much framework, you need to provide sufficient space for placing inside the plasterboard design of the lamps. If point lighting sources apply, then often the height of the frame is limited to 10 cm, but there are exceptions.
Using a laser level, we make the markup of the future plasterboard ceiling as much as possible. It is desirable to produce final marking with a pencil.
In the process, it will be necessary to often cut metal profiles often, since they often do not correspond to the necessary dimensions. For cutting it is best to use scissors for metal. In any case, you can always connect profiles, since metal tools strongly resemble parts of the designer.
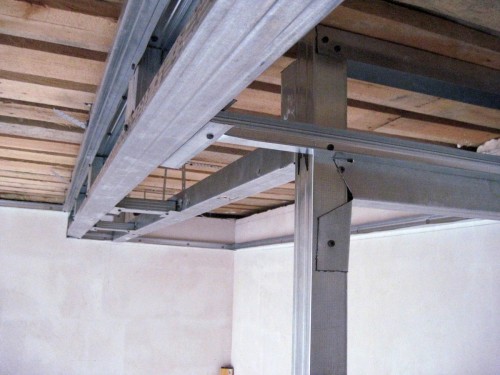
As the framework of the frame, the PNP profile will be used, which is mounted along the wall. Often, these metal elements have holes, however, in the absence, it will be necessary to drill them. The PNP profile is attached to the wall with the help of self-tapping screws. The step between these elements should be about 50 cm.
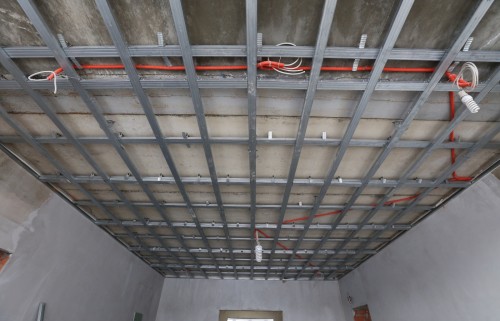
Now the ceiling profile time has come. By making an indentation from the wall (50-60 cm), they are fixed to the main ceiling, it should be borne in mind that this type of profile serves as a kind of ruler for subsequent work, so metal elements will be fixed along the room and for its entire length. Previously, it is necessary to carefully analyze the markup so that all profiles are located as soon as possible. Similarly, the profiles that are already installed across are attached. Accordingly, there will be peculiar cells of about 60x60 cm between the created profiles.
Next, direct suspensions are mounted, which are attached to the surface with the help of self-tapping and dowels. The step between these elements is often up to 70 cm. It is also worth saying that when fixing on the ceiling of any equipment you need to install traverse to adjust the level.
After that, the guide profiles are inserted ceiling metal elements. Fixing the profiles is made by means of screws. Also, you may need to clutch, referred to earlier. To install the profile, which are located on the edge, it is necessary to use a cross. To substantially strengthen the structure, it is necessary to create a bridge, located between the longitudinal profiles. As already mentioned, for cutting these elements required for metal shears.
In places where there is a match profiles, single-level crab should be used. Fixing this element takes place by means of screws.
At the end of the need to carry out fastening elements ceiling profiles (PP) to the suspensions. It is necessary to check the level of each connection, while taking into account that very often be faced with various disabilities. After adjustment, there is the final fixing of the frame.
Next you need to visually check the integrity of the structure. If there are no complaints, it is safe to continue the construction process, creating a skin on the basis of the drywall.


