Hearing windows on the roof Window
Hearing windows on the roof are designed for ventilation and providing natural lighting attic and attic. In some cases, their installation is justified from aesthetic point of view. This article outlines information about the device of auditory windows and on the rules of their installation.
Content
What are hearing windows
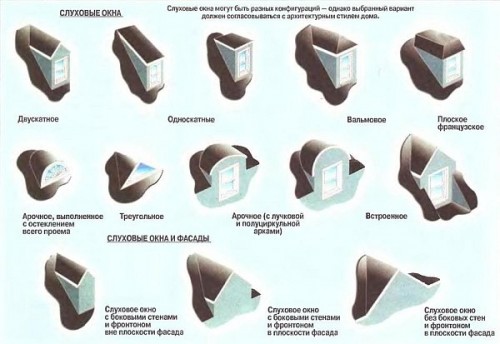
The design and appearance of auditory (mansard) windows may vary.
Designers offer to install windows:
- with a fronton lying in the same plane with the outer wall of the lower tier and the side walls;
- with a fronton in one plane with an outer wall, but without side walls;
- with a fronton, located deeper plane of the outdoor wall of the building and with side walls.
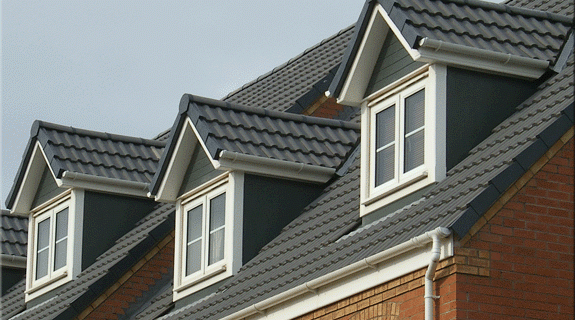
In addition, it is distinguished: single and double windows, holm design, arched (with different rounding radius), built-in, flat (French). For clarity to your attention a different view, auditory windows on the roof (photo).
Important: The design of the auditory window must correspond to the general concept of the building.
About the design of triangular auditory windows
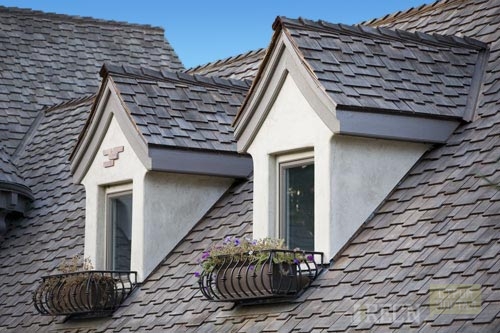
The greatest distribution was obtained designs in the form of a triangle with roofing rods installed under large (about 65 degrees) angle. The triangular hearing window on the roof has the following features.
- The frontal wall of the auditory window is not blocked into the roof, and is located in the same plane with an external wall of the building.
- The auditory window is set exactly above the bottom of the lower tier. Thanks to this, the building in this part looks organic.
- Due to the steep rods, the useful area of \u200b\u200bthe attic is practically no increase.
- Thanks to the rumor window, the facade of the building, as well as the underpants room looks original.
- A sufficient height of space under the roof in the place where the hearing window is installed on the roof, the size of the frame allows you to make a large. This is important to ensure normal ventilation and coverage of the attic.
- The roof over the auditory window is joined with the main roof using a suspension, which eliminates the need to seal the side walls of the roofing superstructure.
Features of the design of auditory windows
Regardless of the design and design of auditory windows, their installation is performed in accordance with the Rules of SNiP. This is necessary to ensure the strength and tightness of the structure.
The main requirements of the regulatory documents are as follows.
- The block angle of the main roof of the main roof should be at least 35 degrees.
- The superstructure is built strictly on the distance installed in the project from the external wall of the building.
- The minimum allowable size of the drop-down sash is 800 × 600 mm, from which the window size should be 1200 × 800 mm.
- In the event of an installation of a hip window with a quadrangular opening, the plane should not coincide with the main wall of the building.
Roof Hearing Window Device: Phased Instructions
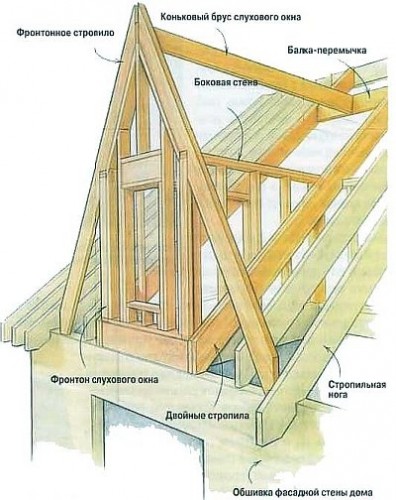
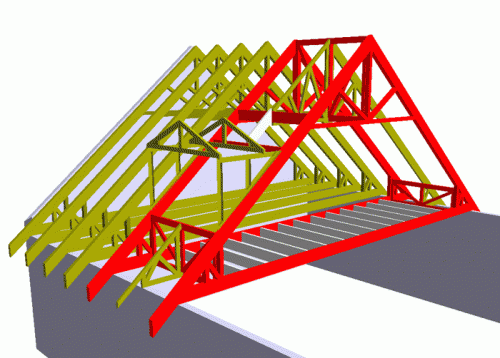
First of all, it is necessary to build a roof frame of the building. To do this, you must perform:
- fronton device;
- installation of rafted and skate timber;
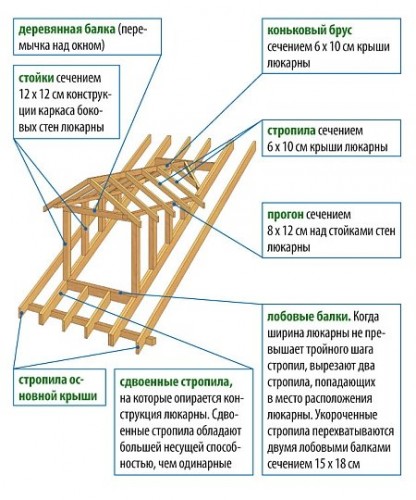
- strengthen the rafting legs, between which an auditory window will be arranged, additional bars: it is necessary to properly distribute the load.
Installation of hearing windows on the roof should begin with the installation of the supports. Their role will play side walls that are the continuation of the external walls of the building. The height of the supporting walls is about 1.5 m. They rely on the beams of overlapping the lower tier. After supporting elements are installed, you can mount horizontally located parts of the rosary frame.
Next steps are carried out in the following sequence.
- Speakers for the cover of the outer wall ends of the rafting feet cut off. This is necessary so that the frontone of the auditory window is located in the same plane with an outer wall.
- At one level, at the location of the skate bar of the planned auditory window, the jumper is fastened between fortified rapid legs. To do this, use overhead brackets from the metal, since the jumper inserts can weaken the design.
- Before fastening the skiing bar, with the help of the level check the verticality of the front part of the rumor framework. After that, the skating timber is installed.
- The pattern is made of rafters for the frontones of the main roof over the auditory window.
- Perform the covering of the frontones with sheets of OSB plates or moisture-resistant plywood. It should be located in the same plane with a facing material of the house.
Installing a hearing window
For a TV in order to docile the ridiculum windows mounted at an angle of about 65 degrees with slopes of the rest of the roof, whose slope angle is less (for example, 40 degrees), it is necessary to use the endandard species. This can be done in the following way.
- The upper part of the roof of the auditory window is arranged with the help of a rafter, which are based on nihols (short rafters), installed at an angle of 65 degrees.
- The length of the rapid lines of the rafter beams is determined and its other sizes, as well as the angles between the beam, the skate and the side wall.
Roof Hearing Drawings
- Using a plumb on the floor, we create a projection center for crossing the skate bar of a hearing window with a slitob. After that, perform a complete projection of the suspension and the beam of the skate. Measure an angle formed by projection lines.
- Under the measured angle, the lower end of the breaking beams are roaming. As a result, it will accurately stick with the wall of the opening.
- Stretch the cord between the angle of the side wall and the skate. Measure the angle under which the upper end of the beam is cut. The distance between the points will be equal to the length of the rapid beams of the suspension.
- The relief beam projection is displayed on the side wall located at the side wall. Determine the dimensions of the lower cutting of the beam.
- Using the results of measurements, the workpiece is made: the part is cut off the required length and the end edges are prepared, cutting them off at the desired angles. After that, the beam is attached to the place.
Important: For the manufacture of shortened rafters, you should use a universal template, with which it is easier to drink the necessary blanks.
Hearing window on the roof: the bottom of the bottom
The lower part of the window with a soft roof device can be built using a more simple design. The beam of the rash is attached to the roof cover, and the rafters of the bartal roof of the window rests. It is more convenient to perform this stage after sheeling the roof of the whole house with OSB plates or moisture-resistant plywood. The design will be stronger if the installation of the sheet material starts on the side walls of the auditory windows.
In order to determine the location of the support beam and its parameters, the following is necessary:
- from the edge of the rafter beam until the outdoor side of the front is stretched with a greasy jackhammer cord and a line is fought off;
- along the length of the resulting line spill the part for the manufacture of the support beam;
- the outer side edge is dumped at an angle of 64 degrees and fasten the marked line.
For the manufacture of rafters of the bottom of the skate, you should use the template, customizing the length and shape of the ends on the place during installation.
Upon completion of the installation of the auditory window, the roof and the sides are cut by moisture-resistant plywood or OSB. Work starts from above, laying sheets along the line of the skate. Sheet metal, bitumen tiles, metal tile and ceramic are used as a facing material.
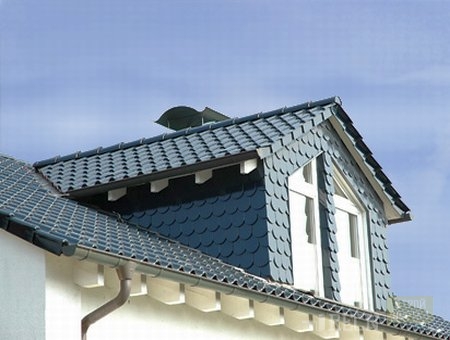
In conclusion - video about the peculiarities of hearing windows, covered with tiles.


