Replacement of sewer tubes Plumbing

If the financial position allows, it is better to hire professional workers to replace sewer pipes in the apartment. In other cases, you can get started on your own. It is just necessary to remember that this is a rather complicated, troublesome, dangerous and responsible. In addition, it is important to know the sewage device. So, let's talk more about how to replace the sewage pipe with your own hands.
From which pipes are made
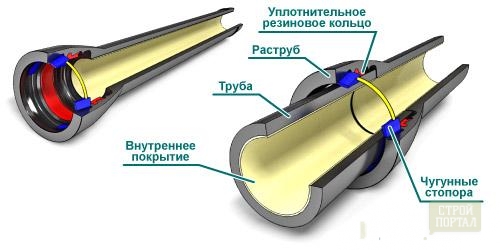
Sewer pipes are mainly made of cast iron or plastic. Moreover, the first are considered better than the second. But plastic can be different. The main types that are used for this purpose are polyethylene, PVC and polypropylene. Each of these materials has its advantages and disadvantages.
Polyethylene
Advantages:
- One of the cheapest materials.
- Installation is quite simple.
Disadvantages:
- Prone to deformations.
- No heat.
- Poor seals.
PVC
Advantages:
- It has the smallest hydraulic resistance.
- You can glue with dichloroethan glue.
Disadvantages:
- The heat resistance is limited to 80 degrees
- Not very high strength and chemical resistance. Because of this, only ultrasound or vanatuz is allowed for cleaning.
Polypropylene
Advantages:
- Heat-resistant. It can withstand temperatures up to 130 degrees.
- Strong enough and reliable. Therefore, pipes made of it can be cleaned even spiral cable and chemically active agents. Except only concentrated alkalis and acids.
Disadvantages:
- Fairly expensive material.
water drain
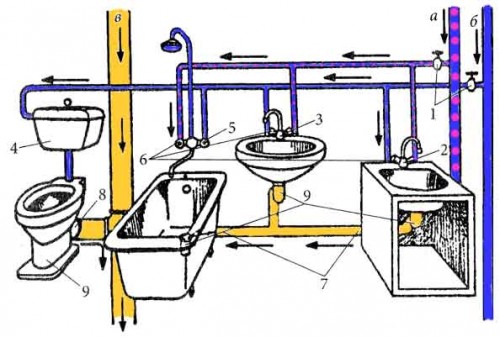
The basic principle of the device of any domestic sewage - whatever the external conditions in the riser needs to be higher than atmospheric pressure. In addition, it is necessary precisely to sustain the desired biases tubes.
If the pressure does not comply with the requirements under the action of air, gases which accumulate in sewage, will be released in an apartment, that can result in not only odor but also to the formation of explosive mixtures.
The slope of the pipes
Sewer pipes are always installed with a certain bias. If it is made a little, then the pipes will not leak fluid, and a very large - the water will flow too quickly, which can lead to clogging.
Building codes set minimum slope of sewer pipes. Below the pipe diameter is specified and the corresponding value of the indicator.
- 200 mm - 7 mm / m;
- 160 mm - 8 mm / m;
- 110 mm - 20 mm / m;
- 50 mm - 30 mm / m.
Maximum slope, according to the same standards must not exceed 150 mm / m. This does not apply to santehpriborov taps and a half meters long. may be joined at a right angle only tubes that are installed in the vertical plane. In general, exposure necessary angles - one of the most important cases in the installation and replacement of sewer pipes.
The diameter of the sewer pipe
- If the wiring length from the outermost point of the riser to less than 7 meters or separate drains of sewer systems go directly to the riser, it is allowed to use a wiring pipe sewage diameter of 32 millimeters. In other cases it is necessary to mount the tube diameter of 40 or 50 millimeters.
- The smallest diameter of the riser pipe is typically 110 millimeters. There are constructions with a diameter of 160 and 200 millimeters.
- If placed PVC pipe and a drain of a kitchen sink only, the bath can be carried out before the tube diameter of 32 millimeters. The diameter of the drain from the bath should be at least 40 millimeters.
precautions
Replacement of sewer pipe in the bathroom of an apartment building can deliver a lot more problems than in the private building. Therefore, before starting repairs, you need to:
- Remove the bowl and completely clean the toilet.
- toilet walls need to paste over with plastic wrap.
- Purchase rubber boots, plastic raincoat, gloves, reliable helmet with protective glass.
How to replace the sewage in the apartment
Order of work
- If there is a need for reconstruction or installation of additional Santechnibors, then you must first determine their installation sites.
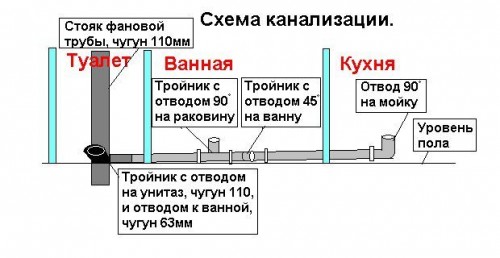
- To draw the scheme of laying the sewage in the apartment with the designation of the location of the pipes, the distance between them, their size and the slope of the plots.
- Inspect the old wiring to choose the way to dismantle it.
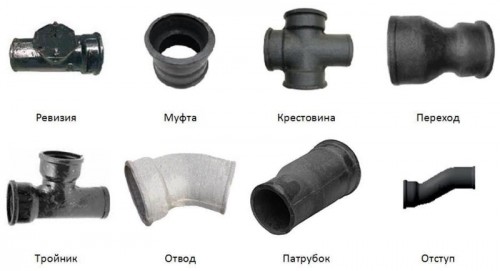
- According to the scheme, determine how much it will be necessary to carry out the repair of components and materials. In accordance with this to buy the right amount of pipes, fittings, sealants, transitional couplings with plastic on cast iron.
- Talking pipes and fittings.
- Install the system in the sections in free space.
- Remove old equipment.
- Install new pipelines with fitting at the place.
- Clean the system with the sealing of the joints.
- Install and connect the necessary plumbers.
- Connect the system to the ventilated riser.
- Wait to simultane out. After that check for leakage.
Instruments are needed
There are several criteria for which the places for future devices should be selected:
- The minimum angle in the horizontal plane for the placement of instruments is 120 degrees. However, try so that when installing horizontal angles it was not at all.
- In advance, buying instruments are not worth it, because Perhaps after the installation of the entire system will have to be overridden with their types.
- Maximum length to siphon:
- for hard wire - 1.5 meters.
- for corrugated - 0.8 meters.
If you call professionals to replace sewer pipes, the price of such services will be, depending on the type of work performed, from 550 to 5,000 rubles.
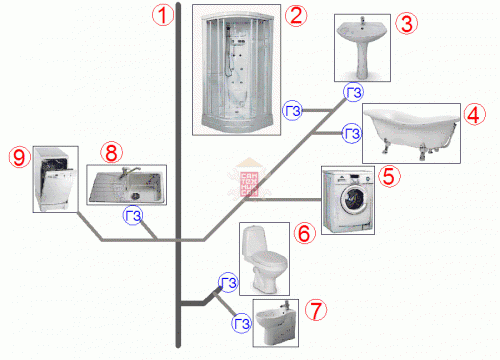
Drawing up the scheme
If the former design is proper, then installing a new sewer system, in fact, is performed according to the old scheme. In other cases, if there are problems with the old sewer, then the diameter and slopes should be kept as accurate as possible. So, in the new scheme must necessarily indicate:
- Apartments where work is planned.
- Location of system elements, indicating the size and distance to the walls. This must be done for each room. If there is a solid tube passing through the wall, then you need to specify its total length and size of each site.
- All installed fittings and various service items.
- The place where the central riser will be located.
The finished scheme is better to give specialists to check.
Example scheme:
Fixation of riser at the top
- When repairing sewer pipes, it is important that the top of the riser is necessarily securely fixed. At the same time, it is impossible to count on regular fastenings - over time they rust and weaken. And they are not always available. If they do not hold out, it will entail additional costs for the owner. In addition, the old cast iron riser can burst due to vibrations created by blows or power tools. Reliable fasteners should not only hold the riser, but also absorb most of the vibrations. The use of such mounts will slightly reduce the chance of a challenge accident.
- To secure the riser at the top, on all its parties, two durable crutches should be installed with a diameter of at least 12 millimeters and to a depth of more than 120 millimeters. Their installation is usually carried out on cement mortar. As a crutch, you can use ready-made studs with mounting colangu or segments of the threaded stud. In the first case, cement will not need. It is also important that the studs perform at least 40 millimeters in the middle of the pipe.
- The riser should be fixed in front and behind a pair of half a stone with dimensions of 2-3 × 40-60 millimeters. Under them it is necessary to put strips of fine rubber. They can be cut independently, for example, from a car chamber.
- On each side of the half a stone, drill holes under the heels. After that, they need to be fixed to the studs between the two nuts. So that the sideways did not occur on the riser, these nuts need to tighten alternately. In no case cannot be attached to one clamp. If necessary, then for the rear clamp you should knock out the groove. Be careful with pipes - cast iron is a very fragile material.
Inspection of an old layout
- This needs to be done in order to decide on the way to dismantle the old wiring. First, the pipeline should be disconnected from the riser and start disassembled from the far end.
- Most often, the pipes are inscribed on the plots, after which the wedge is inserted into the propyl, which is covered with a hammer or sledgehammer until the pipe burst on the cutyl.
- If you plan to replace plastic pipes to similar, then their sections are removed by simply swaying.
- If pig-iron pipes are free from all sides, then the disassembly is carried out in this way, as in the previous version, but it is first necessary to embroider with a chisel or chisel.
Pipe fitting in place
This must be done for the following reasons:
- For the draft markup of the installation site of supporting crutches and determine their quantity.
- Place space for couplings.
- Clarification will remain behind the walls of the tails of pipes that should be enough for landing couplings.
- The definition of places that will be uncomfortable for work, which will allow planning a sequence of action during installation.
Dismantling of old pipes
The sequence of work here is as follows:
- Remove the sealing in the walls.
- Remove the instruments from the kitchen to the bathroom with the release of these rooms.
- Insolit on the wall of the instrument installation location wall.
- If the house is multi-apartment, then you need to warn the neighbors and block the water to the floors.
- Remove the toilet and flush tank.
- Make a distance of 120-150 millimeters from each other two dug on the pipe. Then drive the wedge first to the long-distance, then to the near.
- Survey the sealing of the pipe into the rope of riser and carefully remove the design residues.
- Tires for the adjustable pipe design and toilet to clean from the inside and shut up tight rags.
- Submit water and inform about this neighbors.
Installing a new pipe
This work must be done from the riser. The most important thing is to customize the previous pipe. The sequence sequence of the sections of the sections is as follows:
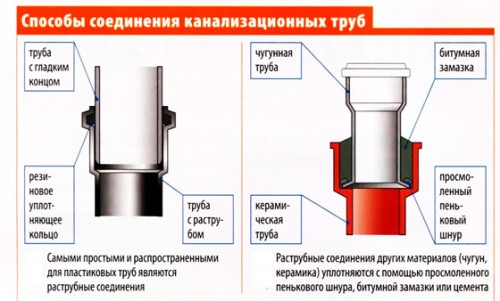
- According to the instructions, set the transition cuffs "Plastic-cast-iron" into the discovery.
- Insert the first section of the pipe into the cuff into the cuff, check whether the mounting nozzle is set correctly.
- Crop the pipe in size, clean the slice and remove the chamfers.
- Finally install on neutral, polyurethane or silicone sealant.
- If the replacement of the riser is not planned, then it is necessary to adjust the unitaase pipe, then put it on the sealant and install the toilet bowl.
- Wait to froze the sealant and check on the leak. To do this, you can fill the bath, then completely open all the cranes and cork. After that, there should be no drops on the floor.
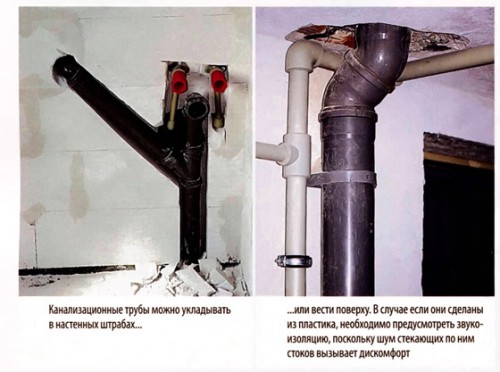
- Make noise insulation pipes.
Sealing junctions
The sequence of actions of this work is as follows:
- Treat every gasket with a thin layer of neutral, polyurethane or silicone sealant. It should be applied by a very thin layer directly on the inner surface of the mounting nozzle. A layer of medium thickness is applied to the outer side of the conjugated pipe.
- Insert the pipe in the coupling.
- Wrap the joint with a thin polyethylene film and with a spatula to dissolve the sealant.
- Film must not be removed until the sealant freezes.
Replacing the riser
The procedure for replacing the riser is as follows:
- Strengthen the riser.
- Overlap water.
- Make in the middle of the old riser two cut.
- In the lower propyl inserted at the angle of 45 degrees two wedges.
- Alternately hitting the wedges, to achieve pumping pipes.
- To rearrange the wedges to the upper feed and in the same way to achieve a seven of a piece of pipe.
- Chisel either by the chisel to remove as much sealing of the top joint. At the same time, the top of the pipe should keep the second person.
- Shaking, remove the top of the pipe.
- Select the sealing of the lower joint and gently swaying remove the bottom of the pipe.
- Produce a rough assembly of a new riser. At the same time, the lower pipe should be adjusted exactly in size.
- Make a finite assembly on the sealant. Connect the wiring and install the toilet.
- Submit water.
- Secure the riser with the help of clamps at least four places.


